Getting started
Numana Works runs inside your Shopify admin. After you install it, your products, variants, inventory and locations sync automatically — there's nothing to import.
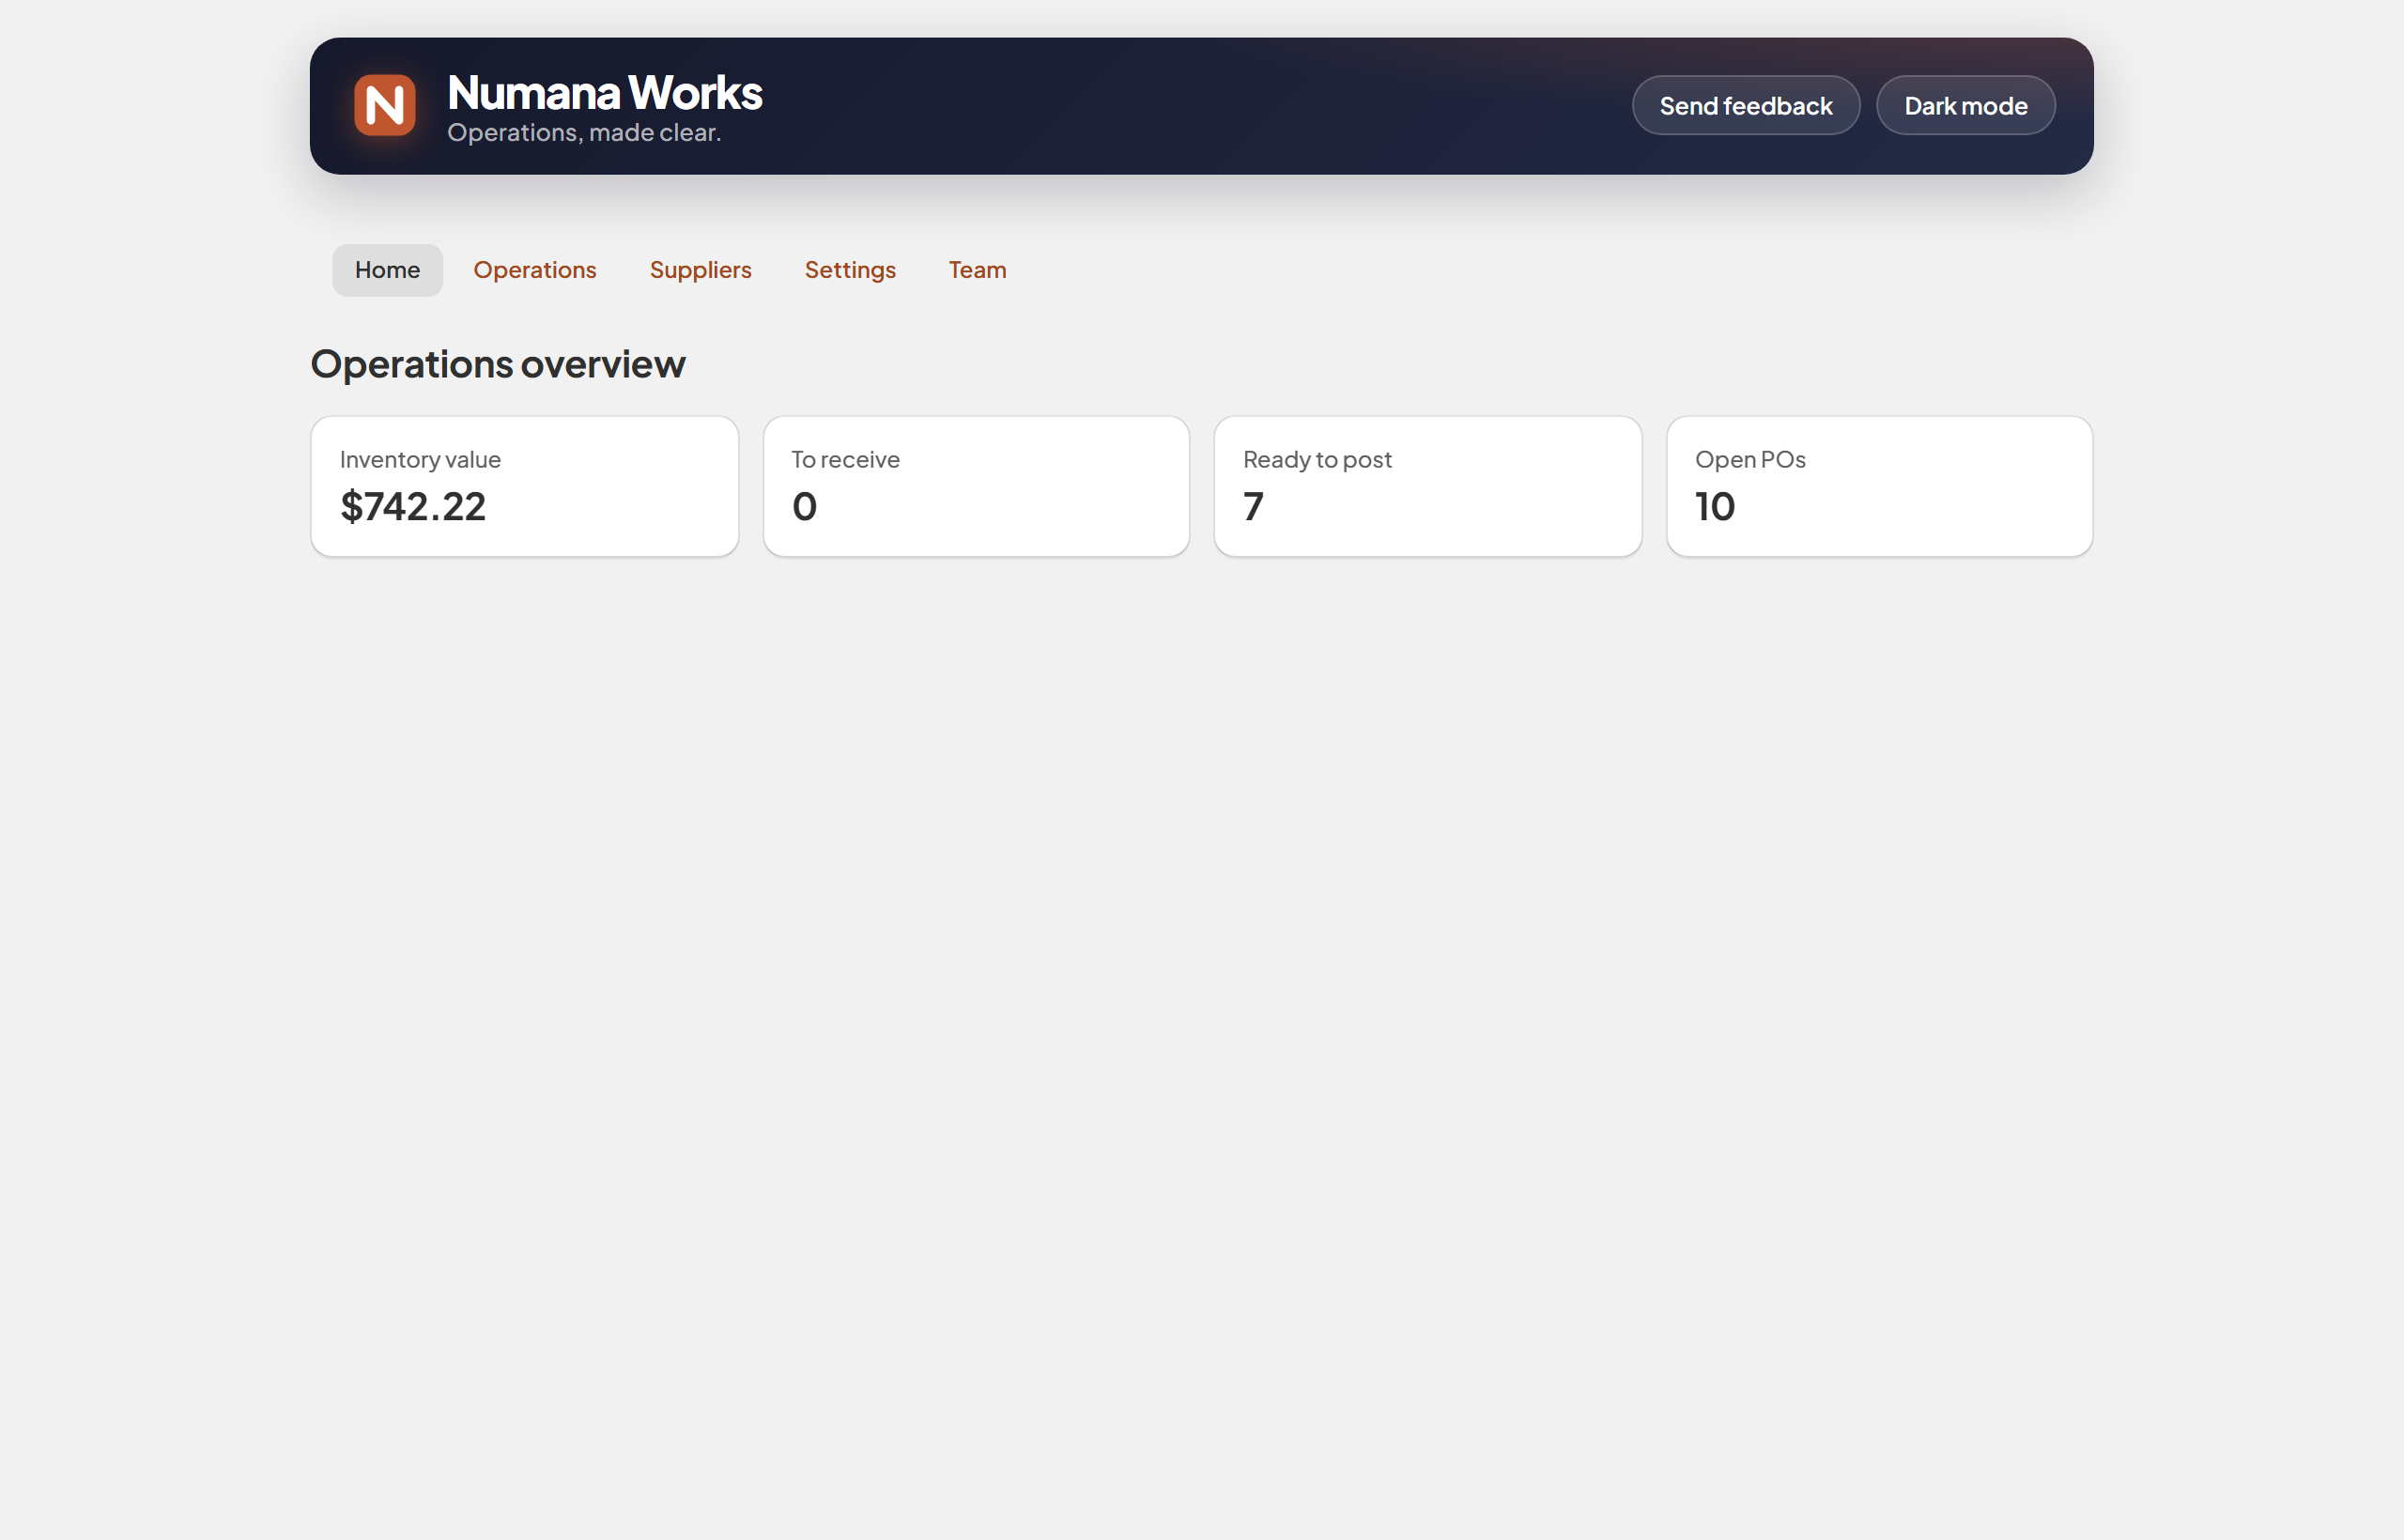
Your Home tab — the whole operation at a glance.
- Install Numana Works from the Shopify App Store — it opens right inside your Shopify admin.
- Let it sync. Products, variants, inventory levels and locations come straight from Shopify automatically. Your opening stock is your current Shopify count.
- Choose the Operations plan to start your free trial.
- Add your suppliers in the Suppliers tab (a quick form — usually a short list).
- Open Home to see live inventory value, open purchase orders, and what's waiting to be received or posted.
Right after install, Home shows your inventory value (Shopify count × your unit cost), how many deliveries are to receive and ready to post, and your number of open POs — each number links straight to the screen behind it.
- No Shopify POS Pro required — Numana Works works for any Shopify store.
- Every number on Home matches its destination screen, so you can trust it at a glance.
Purchase orders
Create purchase orders, send them to your suppliers, and track each one from draft through to fully received — all in one list.
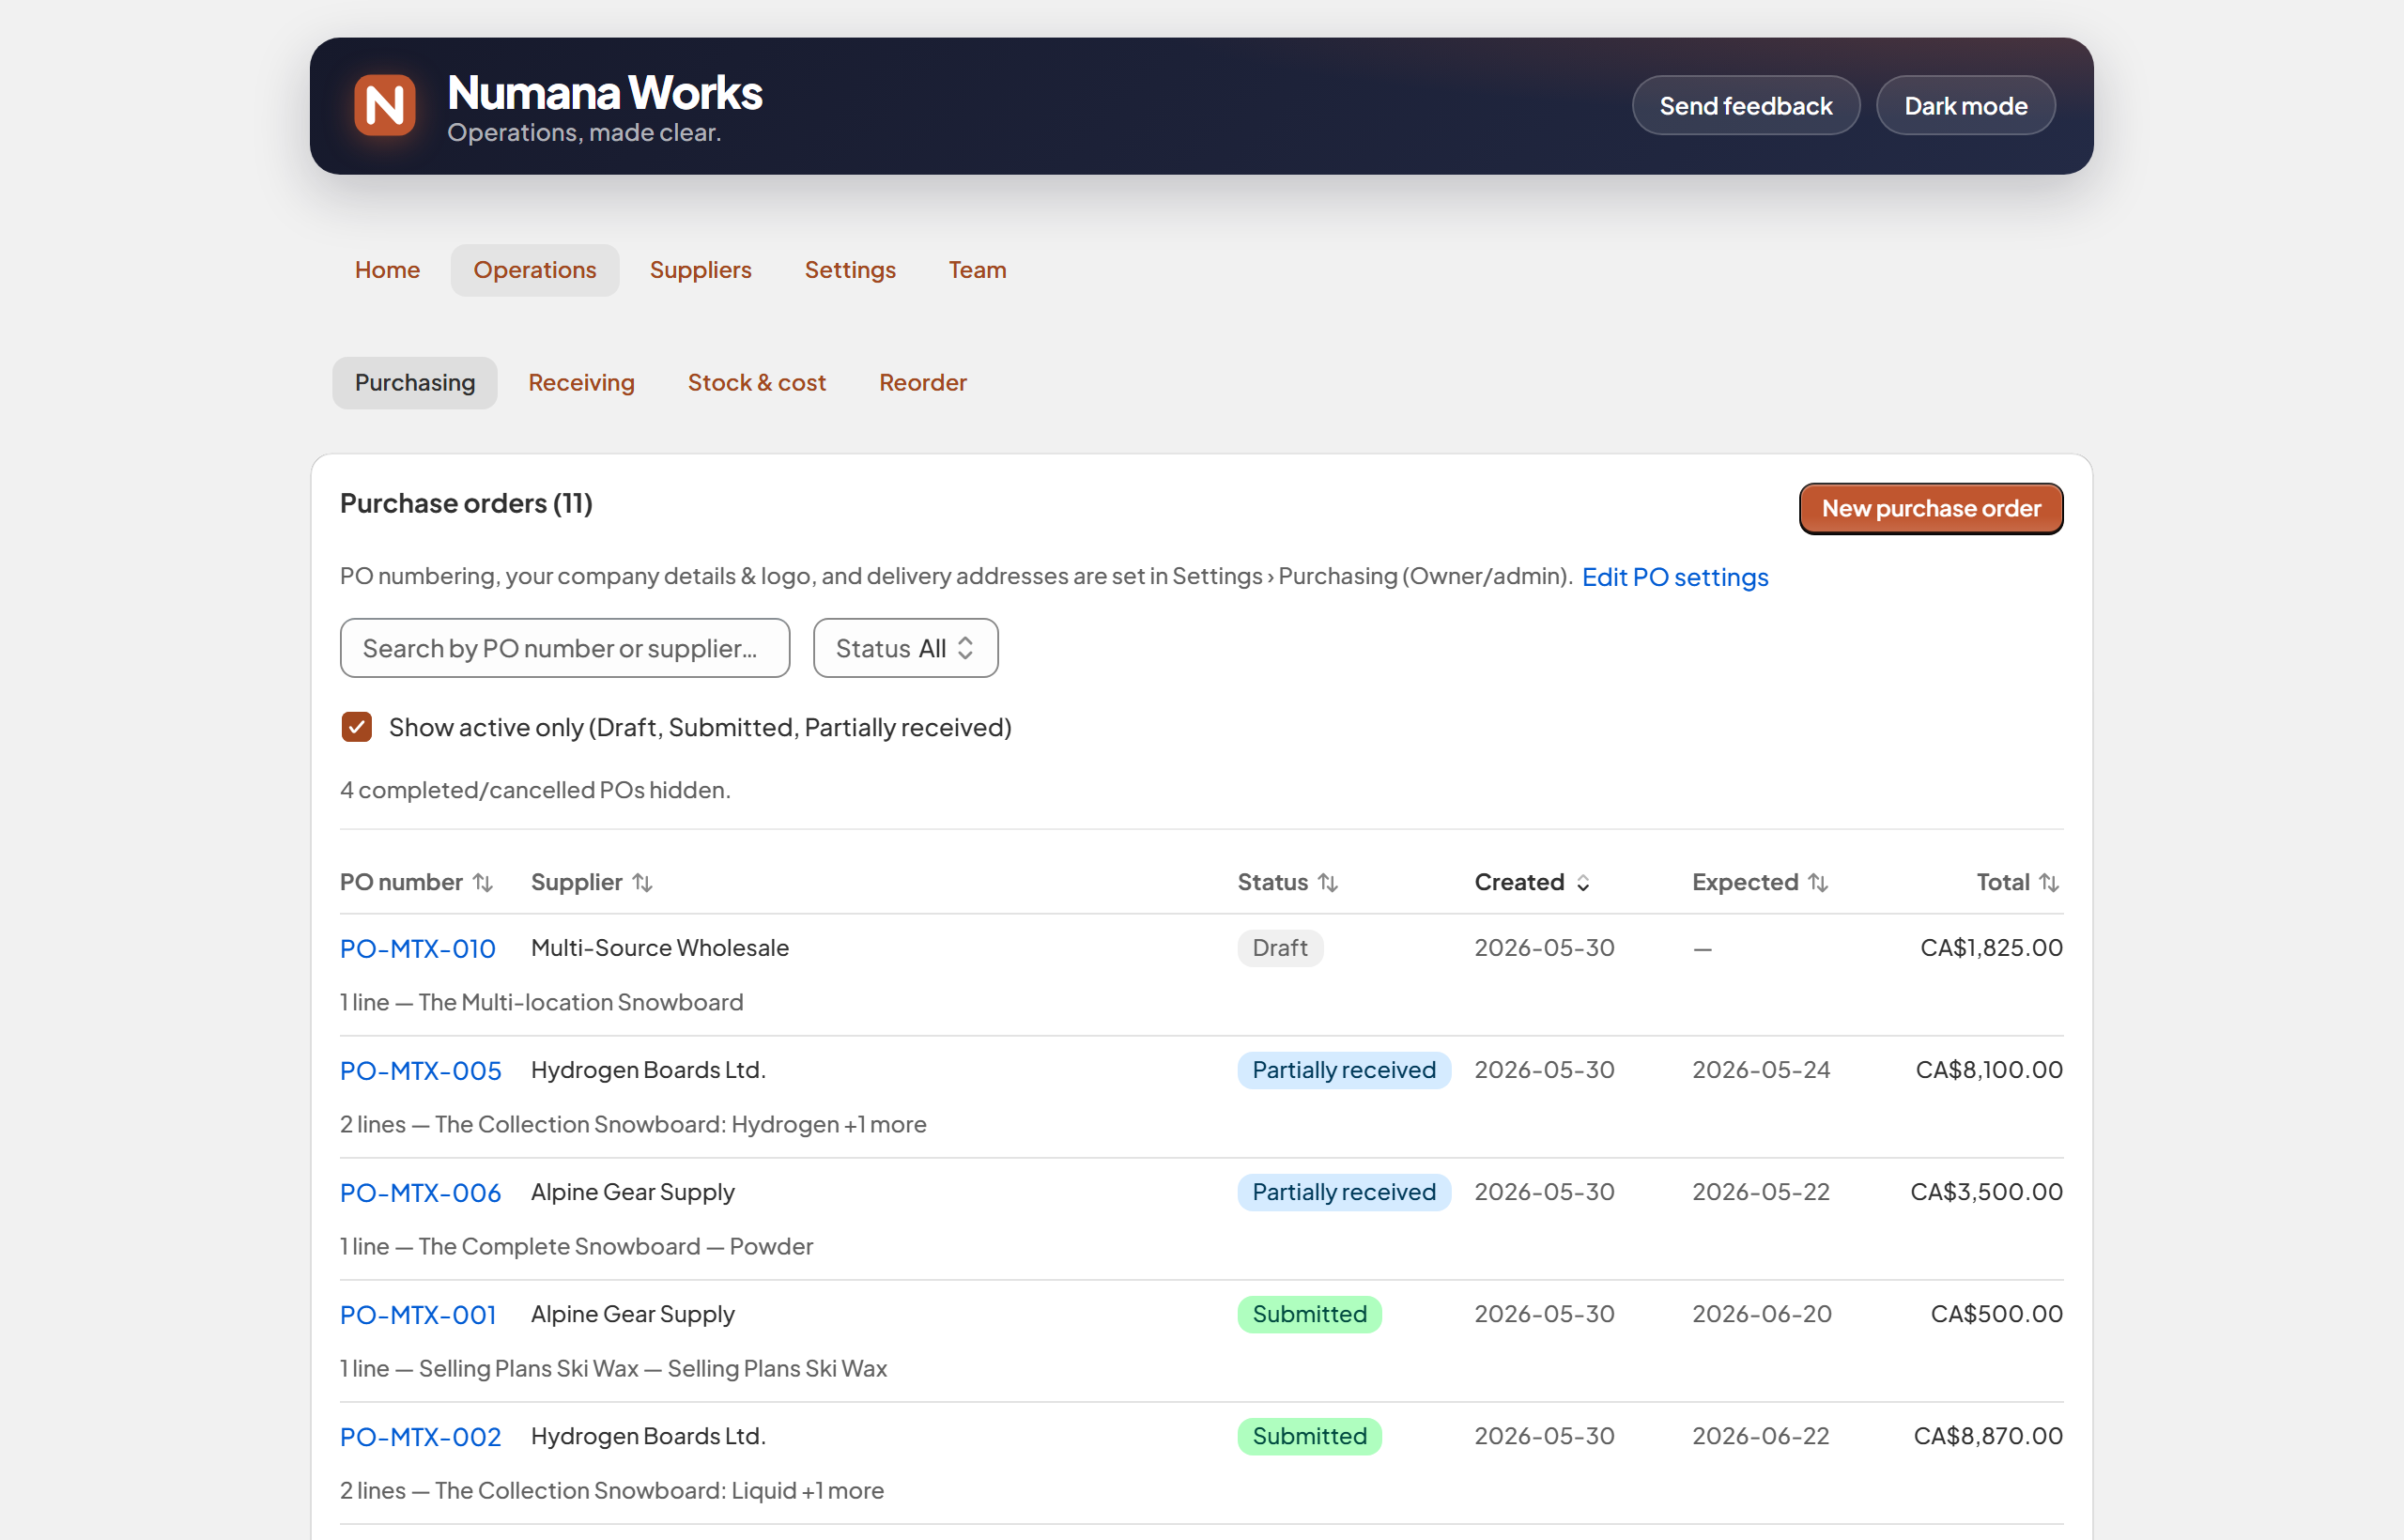
The Purchasing list — every PO with its status, supplier, dates and total.
- Go to Operations → Purchasing and click New purchase order.
- Pick a supplier from the searchable list (or add a new one inline). The PO number is filled in for you — edit it if you use your own scheme.
- Set the currency, an optional expected delivery date, and the receiving location (where the stock will land — required to submit).
- Add line items — product, quantity and unit price. Add payment terms and notes for the supplier if you like.
- Save as draft to keep working, or Save & submit to lock it in and send it to your supplier.
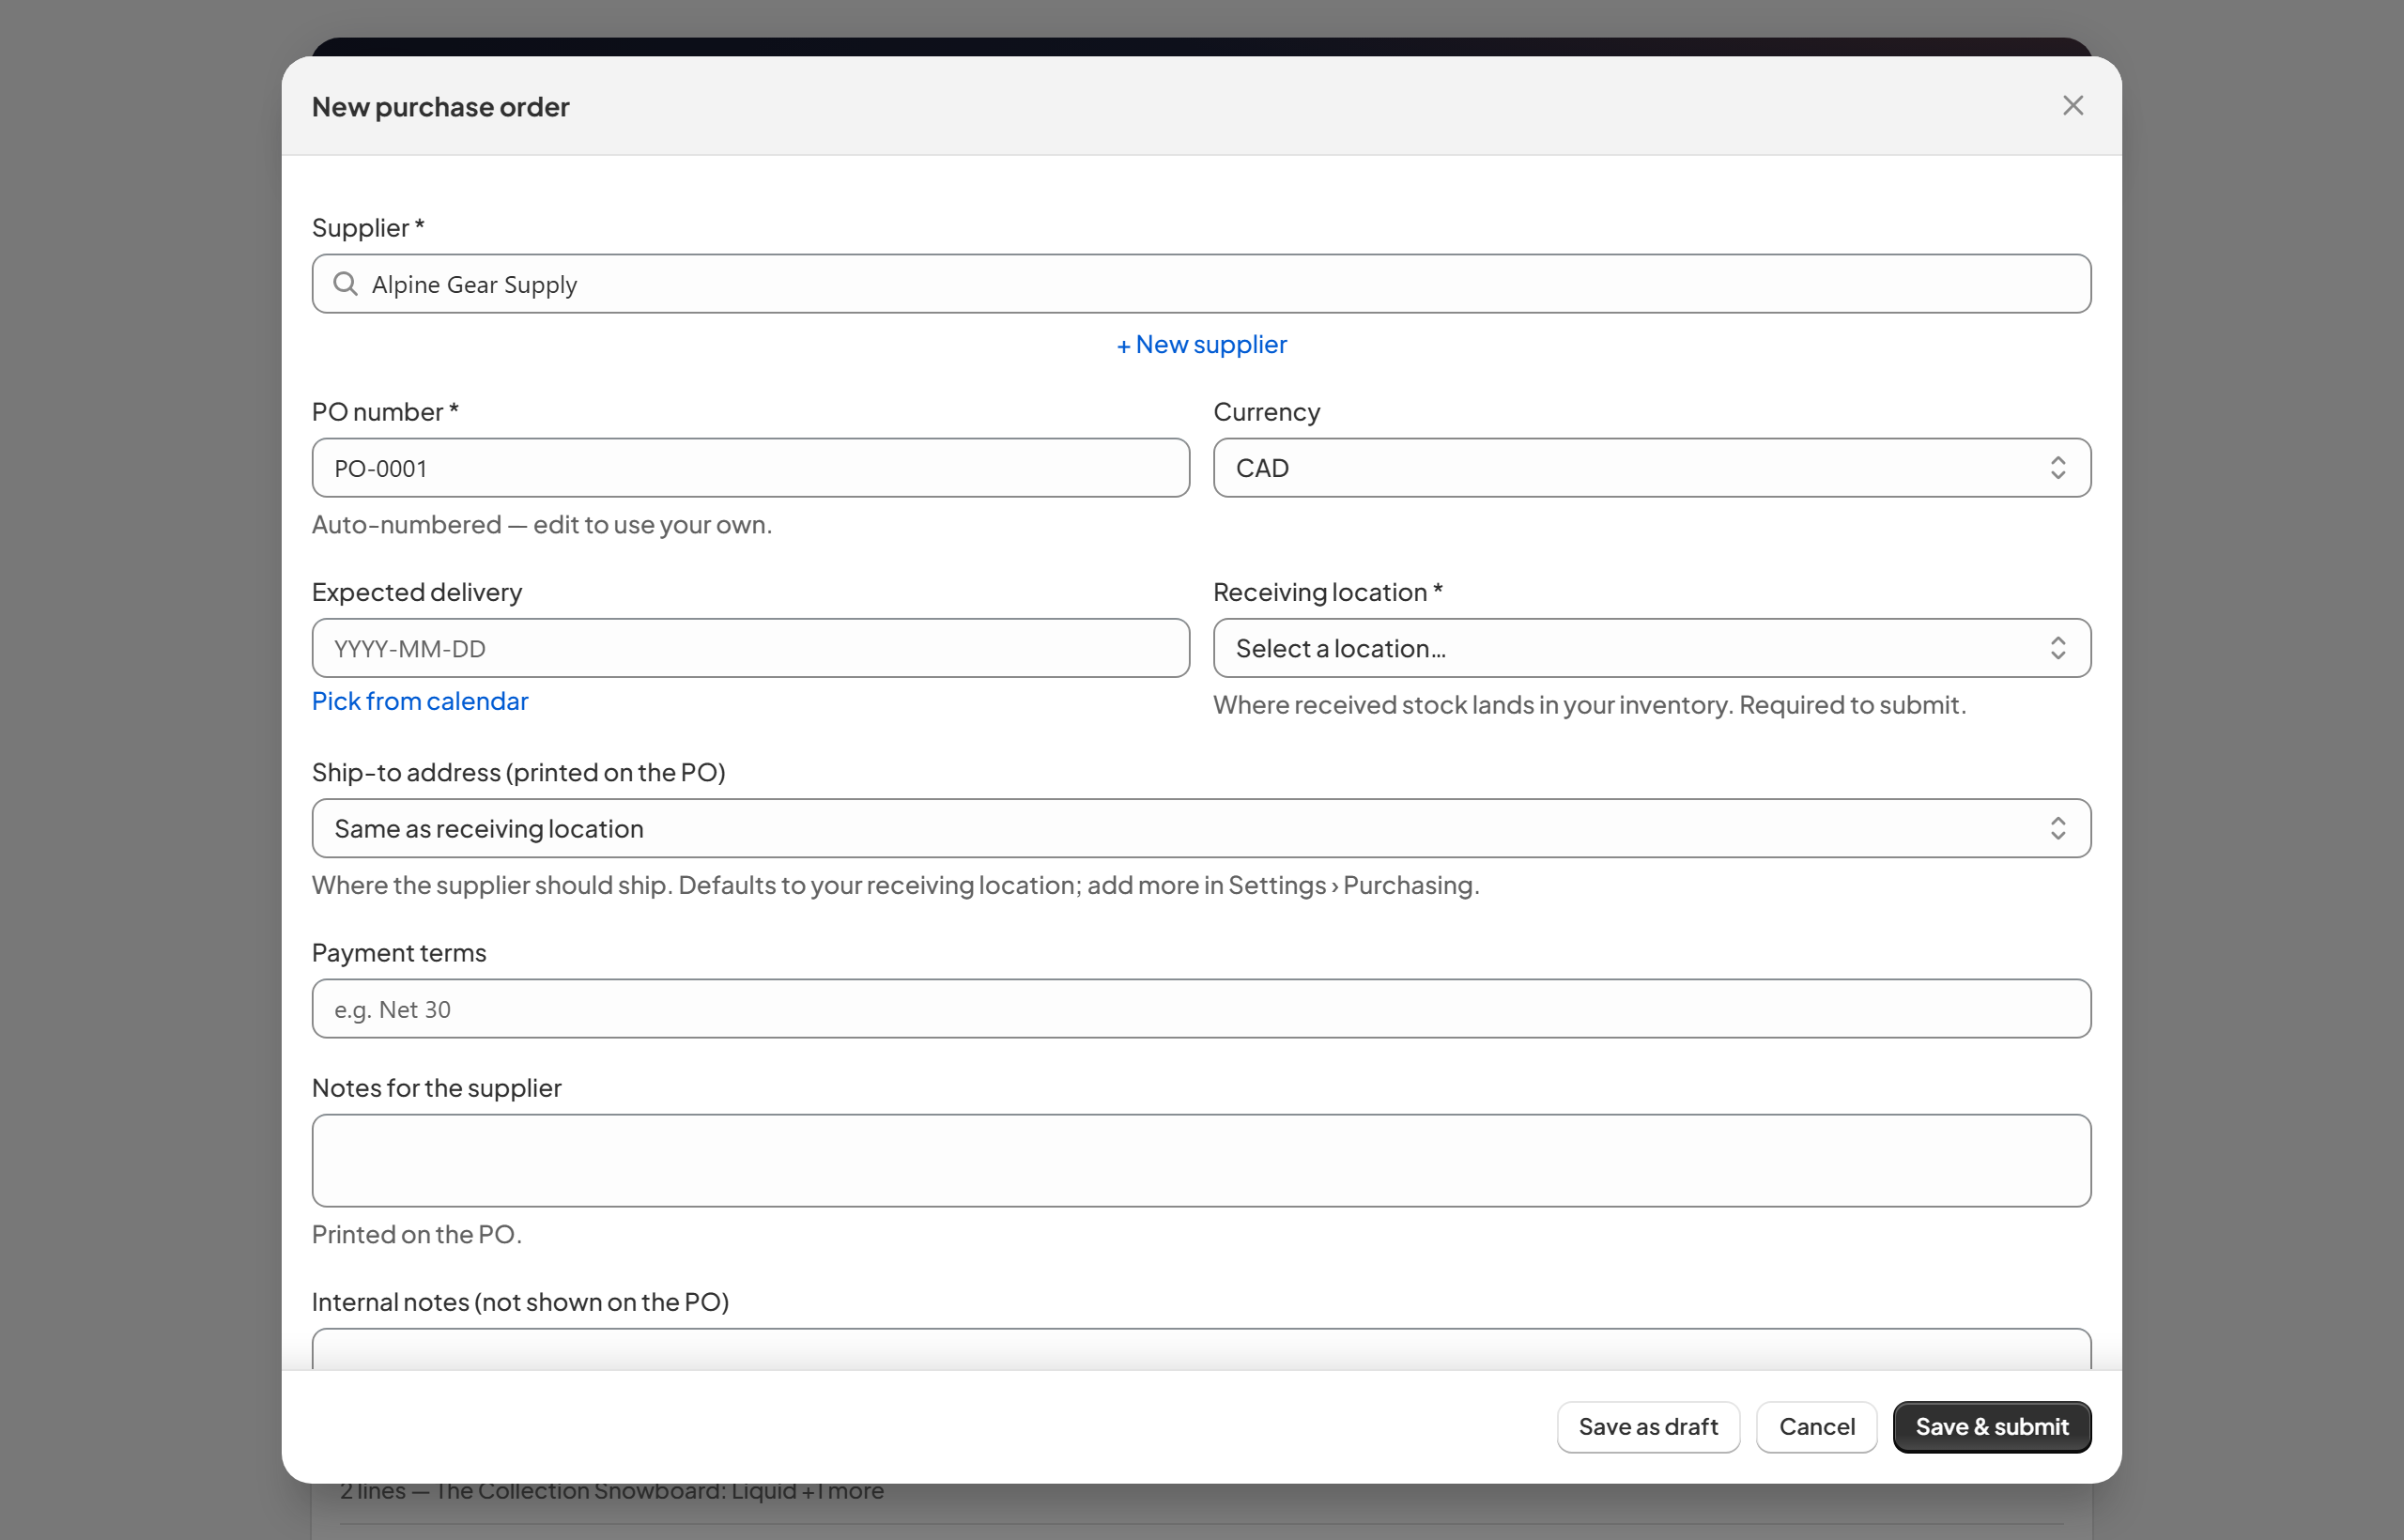
The PO builder — auto-numbered, with delivery location, currency and terms.
Ordering 50 of The Complete Snowboard from Alpine Gear Supply: pick the supplier, the PO auto-numbers to PO-0001, choose your warehouse as the receiving location, add the item with quantity 50 and your unit price, then Save & submit. It now shows as Submitted in the list and is ready to receive against later.
- Add your company name, address, logo, terms and footer so the PO you send suppliers looks professional — set it in Settings › Purchasing.
- Statuses move automatically: Draft → Submitted → Partially received → Completed.
- Search by PO number or supplier, and filter by status, to find any order fast.
Receiving
Receiving is deliberately two steps: log a delivery fast when it lands, then settle the cost when you're ready. The costing step is where your true unit cost is built — from the PO price plus any freight and duties — and written to Shopify. Pick a part below.
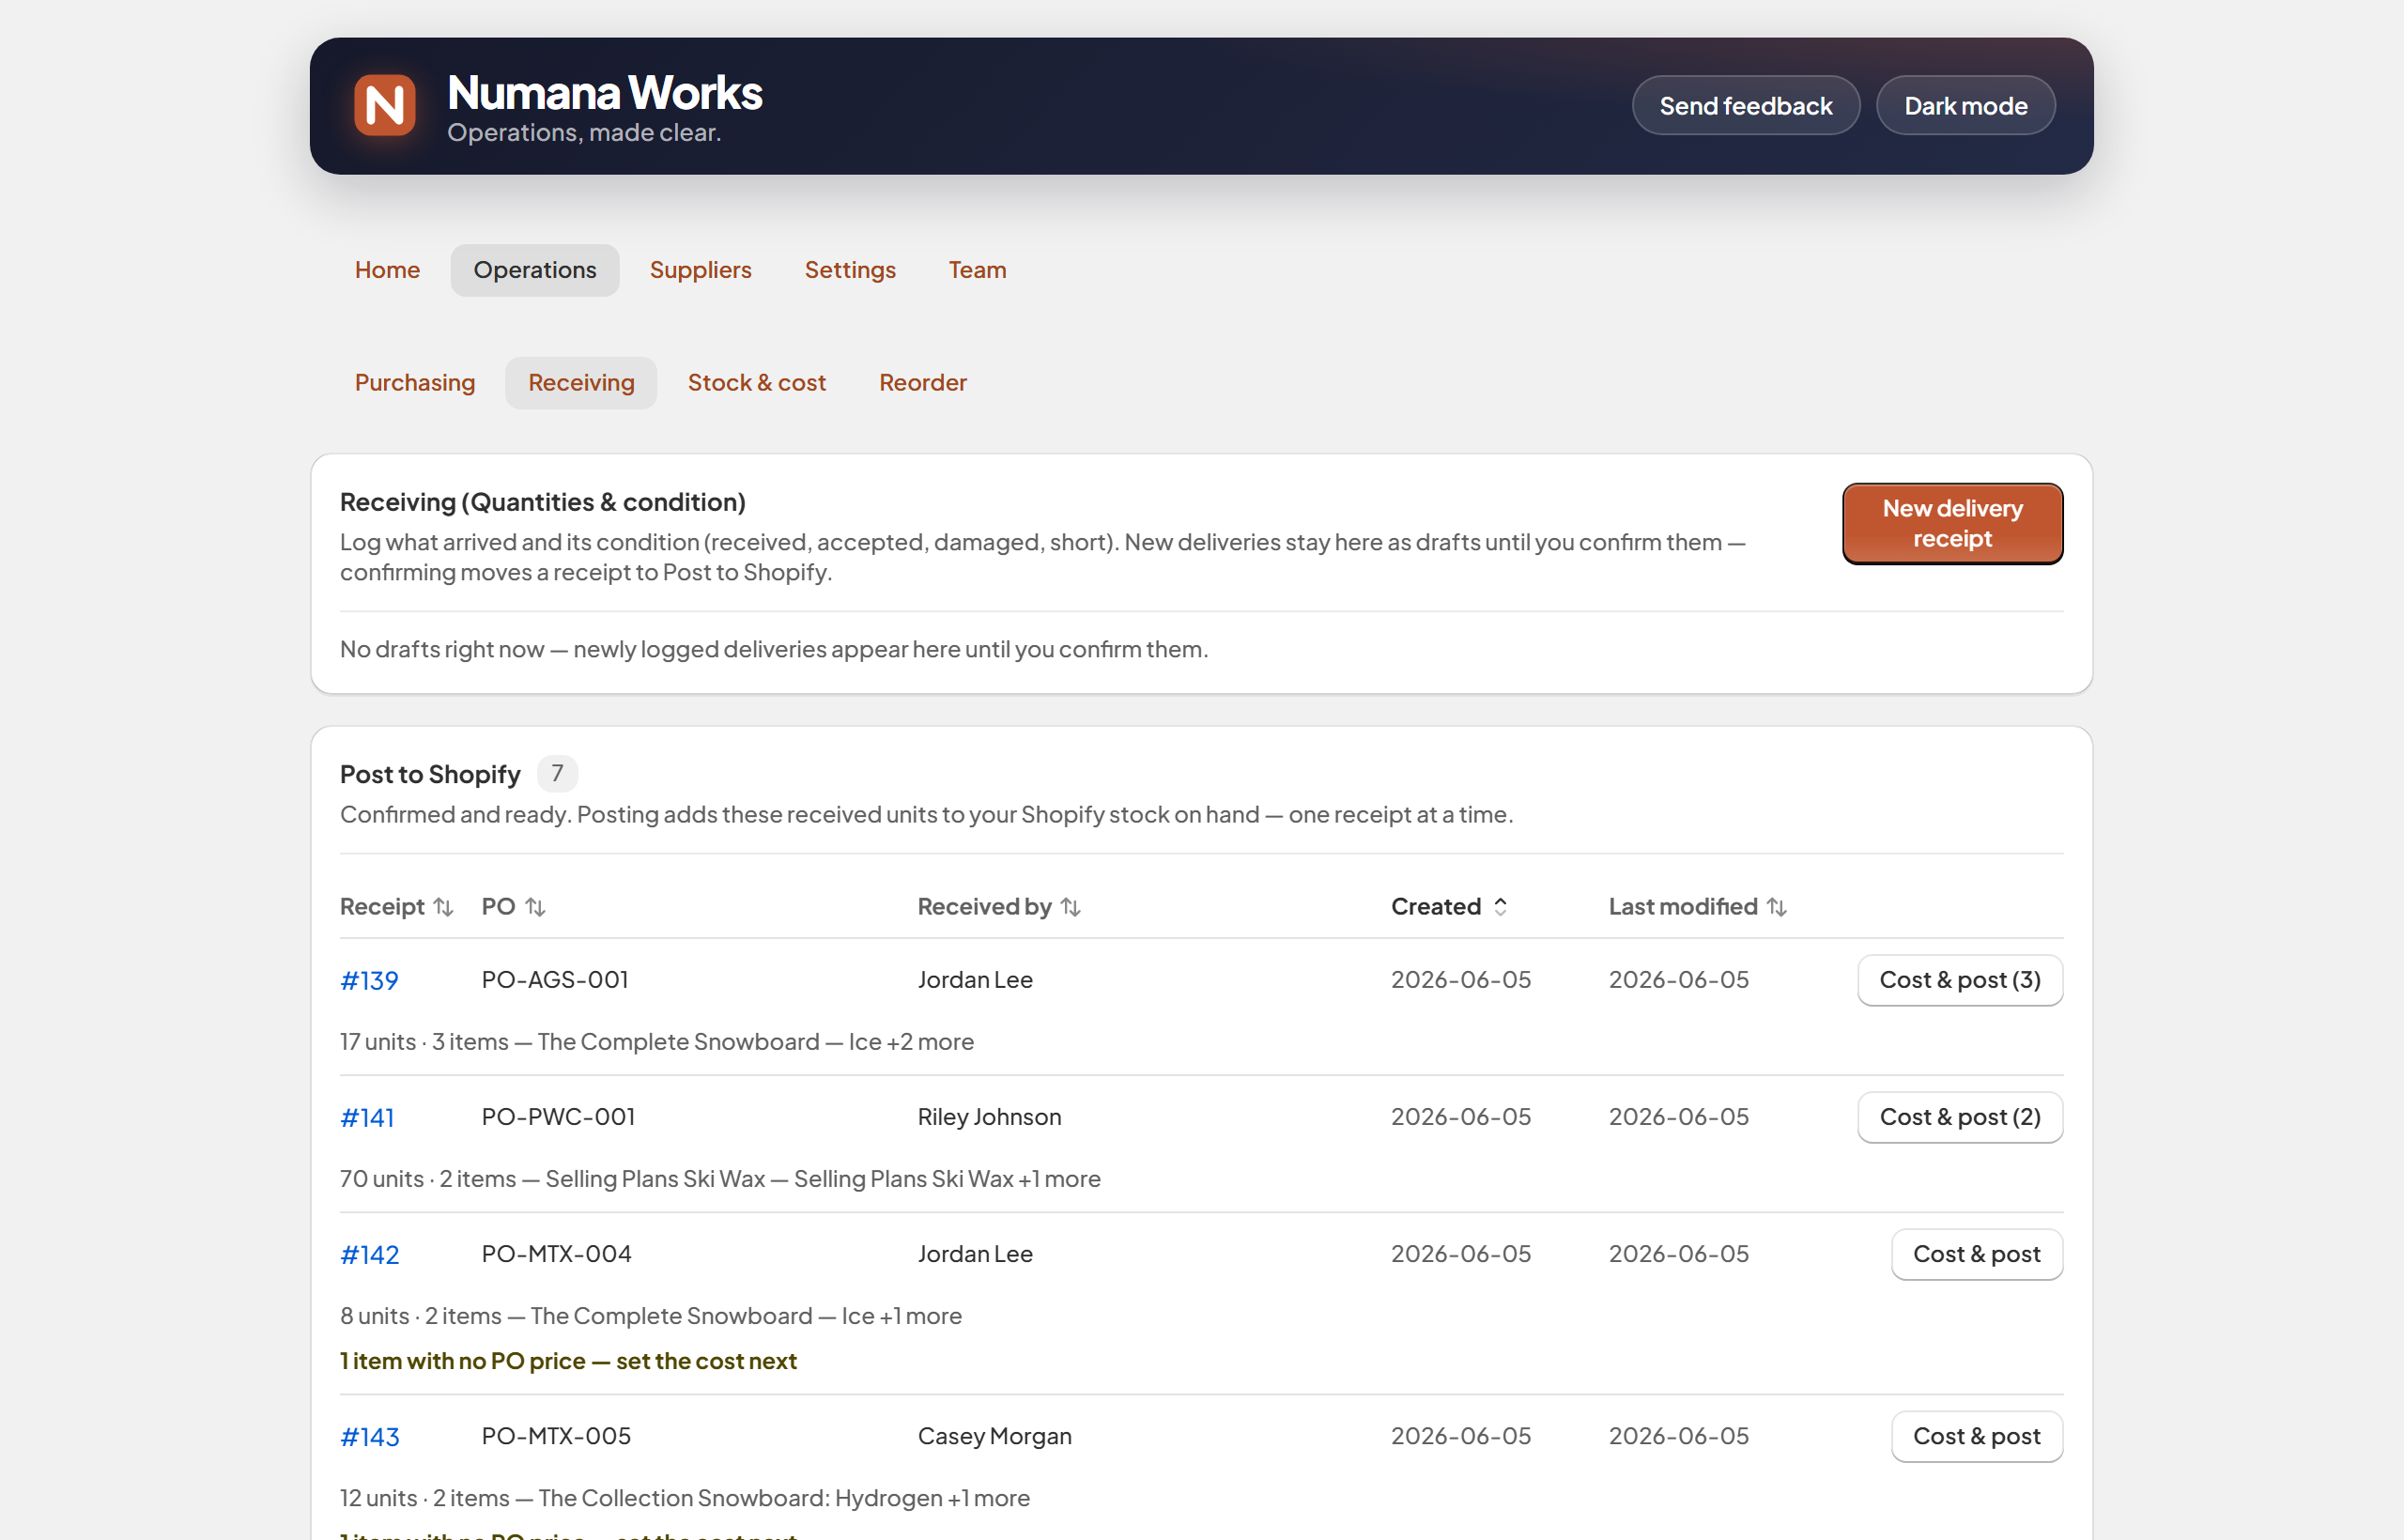
Two steps: log quantities & condition, then cost & post to Shopify.
Step 1 — log what arrived
- Open Operations → Receiving and click New delivery receipt (or open the matching PO).
- For each line, record what actually arrived — accepted, damaged or short. Only accepted units become sellable stock.
- Confirm the receipt. It moves down to Post to Shopify, ready for costing. (Nothing has reached Shopify yet.)
Step 2 — cost & post
- Click Cost & post on a confirmed receipt.
- Set the cost (see Building the cost) and choose how it should land (Blend or revalue?).
- Click Post to Shopify.
Posting adds the accepted units to your Shopify on-hand and writes the unit cost to Shopify — one receipt at a time. Step 1 alone touches nothing in Shopify; only posting does.
- If Shopify's count drifts after posting (a sale slipped in mid-update), the receipt appears under Needs your attention so you can retry the push or accept Shopify's count.
Building the cost
The cost you post is built per item, in two parts: a base unit cost, plus any shipment costs spread across the lines to give a true landed cost.
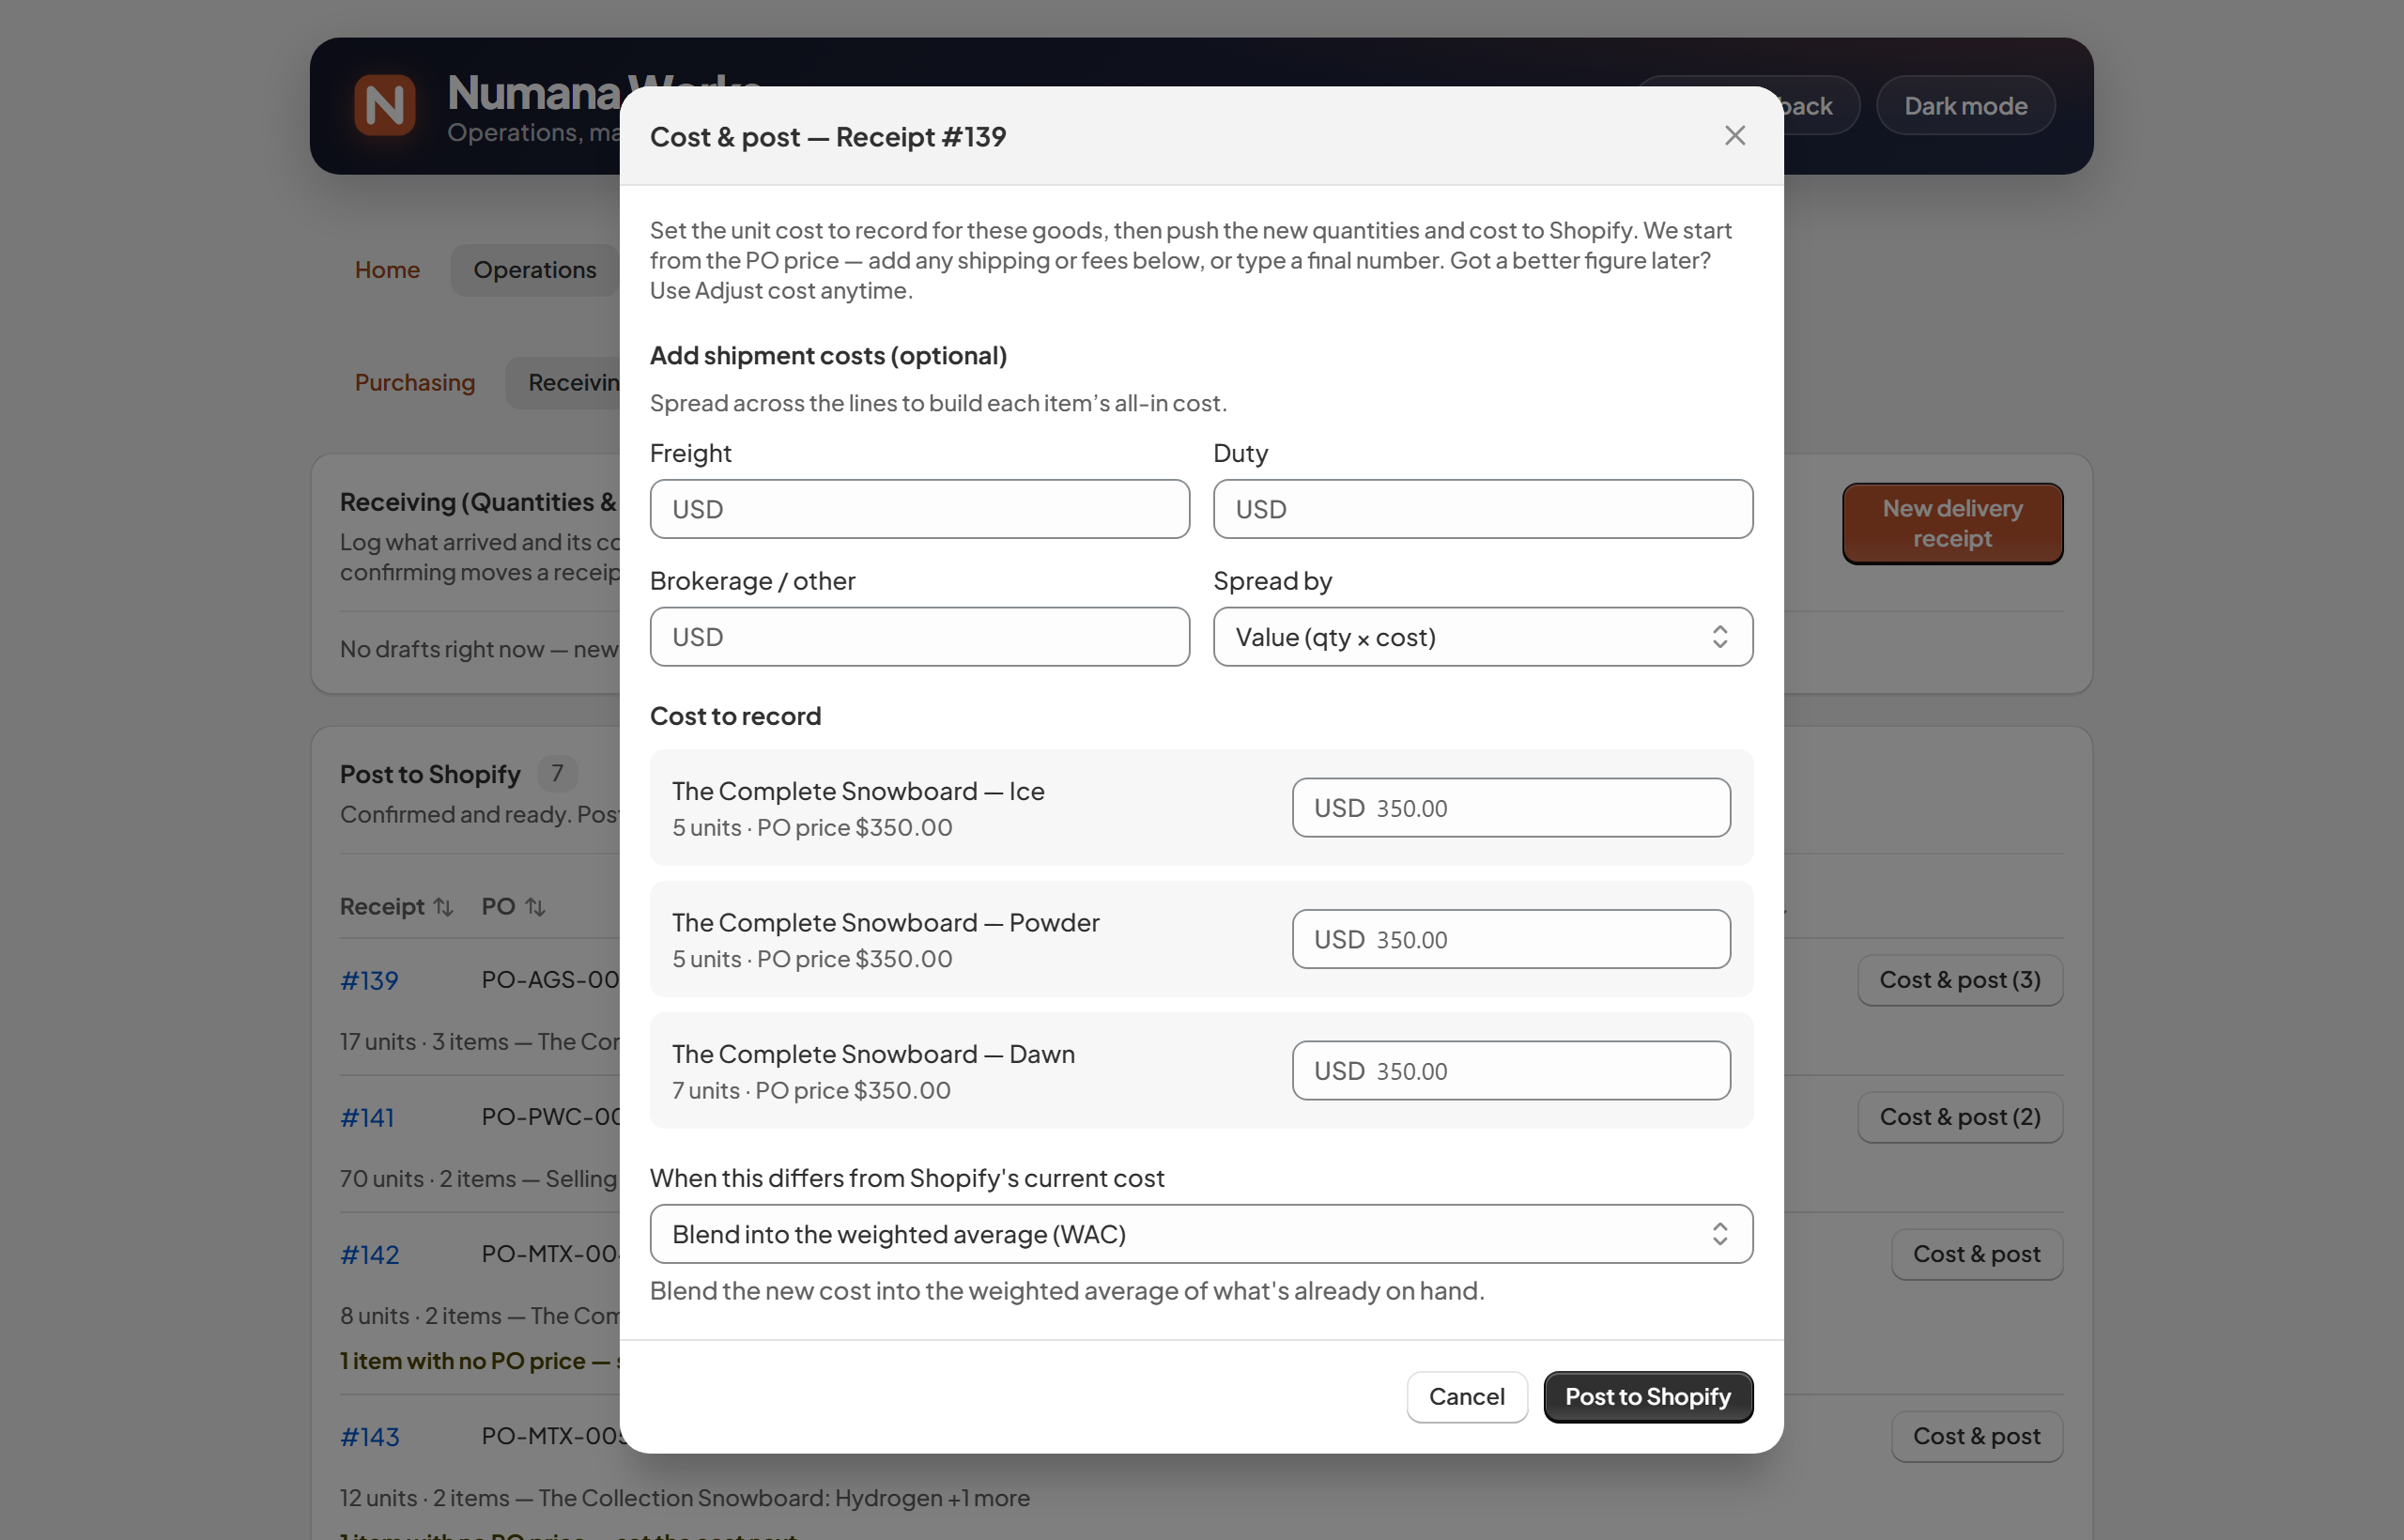
The cost & post screen — base cost, shipment costs, and the resulting per-unit cost.
Each line starts pre-filled, so you usually don't type anything:
- From the PO price — if the receipt is linked to a purchase order, the line uses what you agreed to pay.
- Falls back to your Shopify cost — if a line has no PO price, it uses the item's current cost, so it's never left at zero.
- Type your own — override either with the final figure if you already know it (say the supplier invoice differs).
Add freight, duty and brokerage / other for the whole shipment, then choose how to spread them across the lines. The choice changes which items absorb more cost:
Spread by value (qty × cost)
Allocated in proportion to each line's value — expensive items absorb more of the freight/duty than cheap ones.
Best for duties (often value-based) and mixed shipments of high- and low-value goods.Spread by quantity (units)
Allocated evenly per unit — every unit absorbs the same amount, regardless of price.
Best for freight on similar items, where cost tracks how many boxes shipped, not their value.As you type, each line shows its resulting per-unit cost (base + its share of the shipment costs) — your true landed cost.
15 snowboards are accepted at a PO price of CA$350 each. Add CA$200 freight spread by quantity — about CA$13 per unit — and each posts at a landed cost of roughly CA$363. Spread that same CA$200 by value across a mixed shipment instead, and the pricier lines take a bigger share.
Blend or revalue?
Shopify keeps one cost per item. When the cost you're posting differs from the item's current Shopify cost, you choose what happens to it.
Weighted average (blend in) — the default
The newly received units at their landed cost are averaged in with the stock you already hold. Existing on-hand keeps its value; the per-item cost moves toward the new one in proportion to quantities.
Use for normal, ongoing purchasing — prices drift and you want a smooth average.Revalue (set exact cost)
Shopify's cost is replaced with the new landed cost, and your on-hand is revalued to it.
Use when the new cost is the correct one going forward — a price reset, or fixing a previously wrong cost.Either way, posting adds the received units to Shopify on-hand and writes the item's cost to Shopify. Blend nudges the weighted-average cost (no revaluation of existing stock); Revalue overwrites the cost and re-prices what's on hand, so your inventory value steps to the new figure.
- Not sure at the time? Use Adjust cost on Stock & cost any time to correct or revalue.
Stock & cost
Keep your inventory quantities and true unit costs accurate. Four tools do the work — each writes its result straight to Shopify, and each is recorded in your Stock & cost history with a permanent ID. Pick one below for the full how-to and exactly what it changes in Shopify.
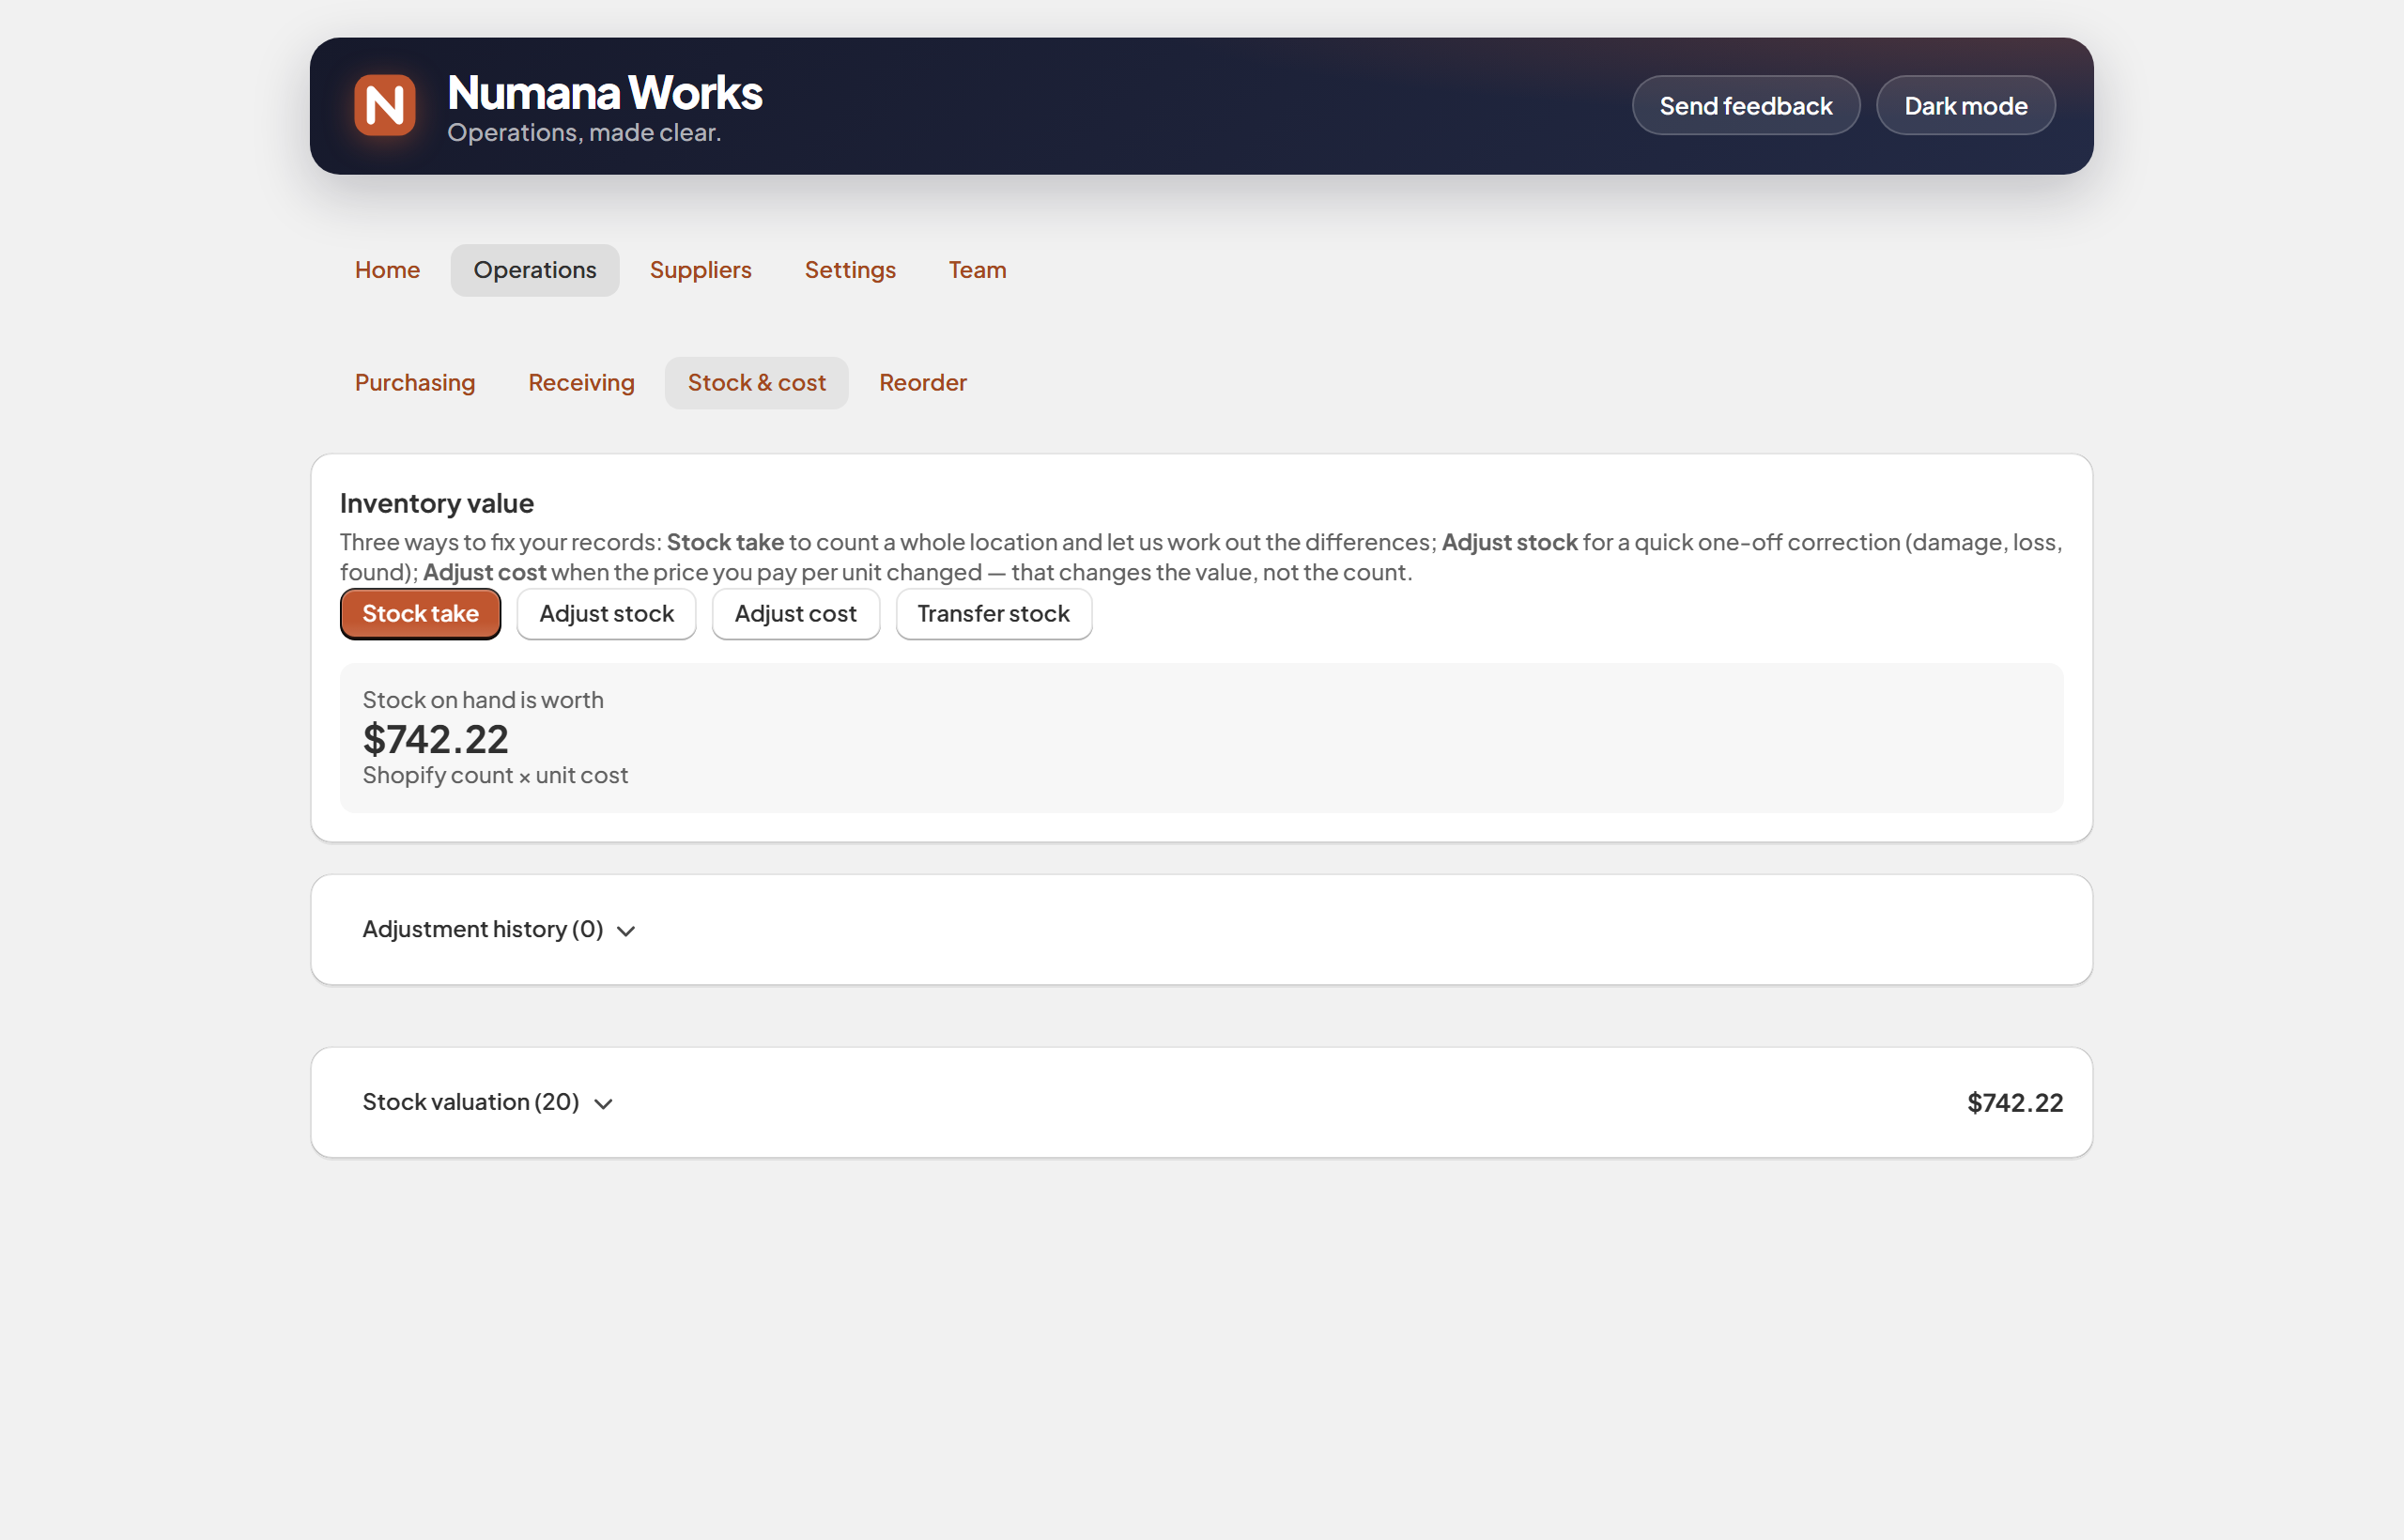
Your inventory value, plus the four tools.
Stock take — count a whole location
The right tool when you're counting everything at one location (a full or partial count), not just fixing one item.
- On Stock & cost, click Stock take, pick the location you're counting, then Start counting.
- Go down the sheet and enter what's physically on the shelf for each item. The Shopify column shows the current count, and the Variance updates as you type.
- Leave an item blank to skip it (it isn't touched). Counting a big catalog? Save & finish later picks up where you left off.
- Click Apply counts.

Step 1 — pick the location.
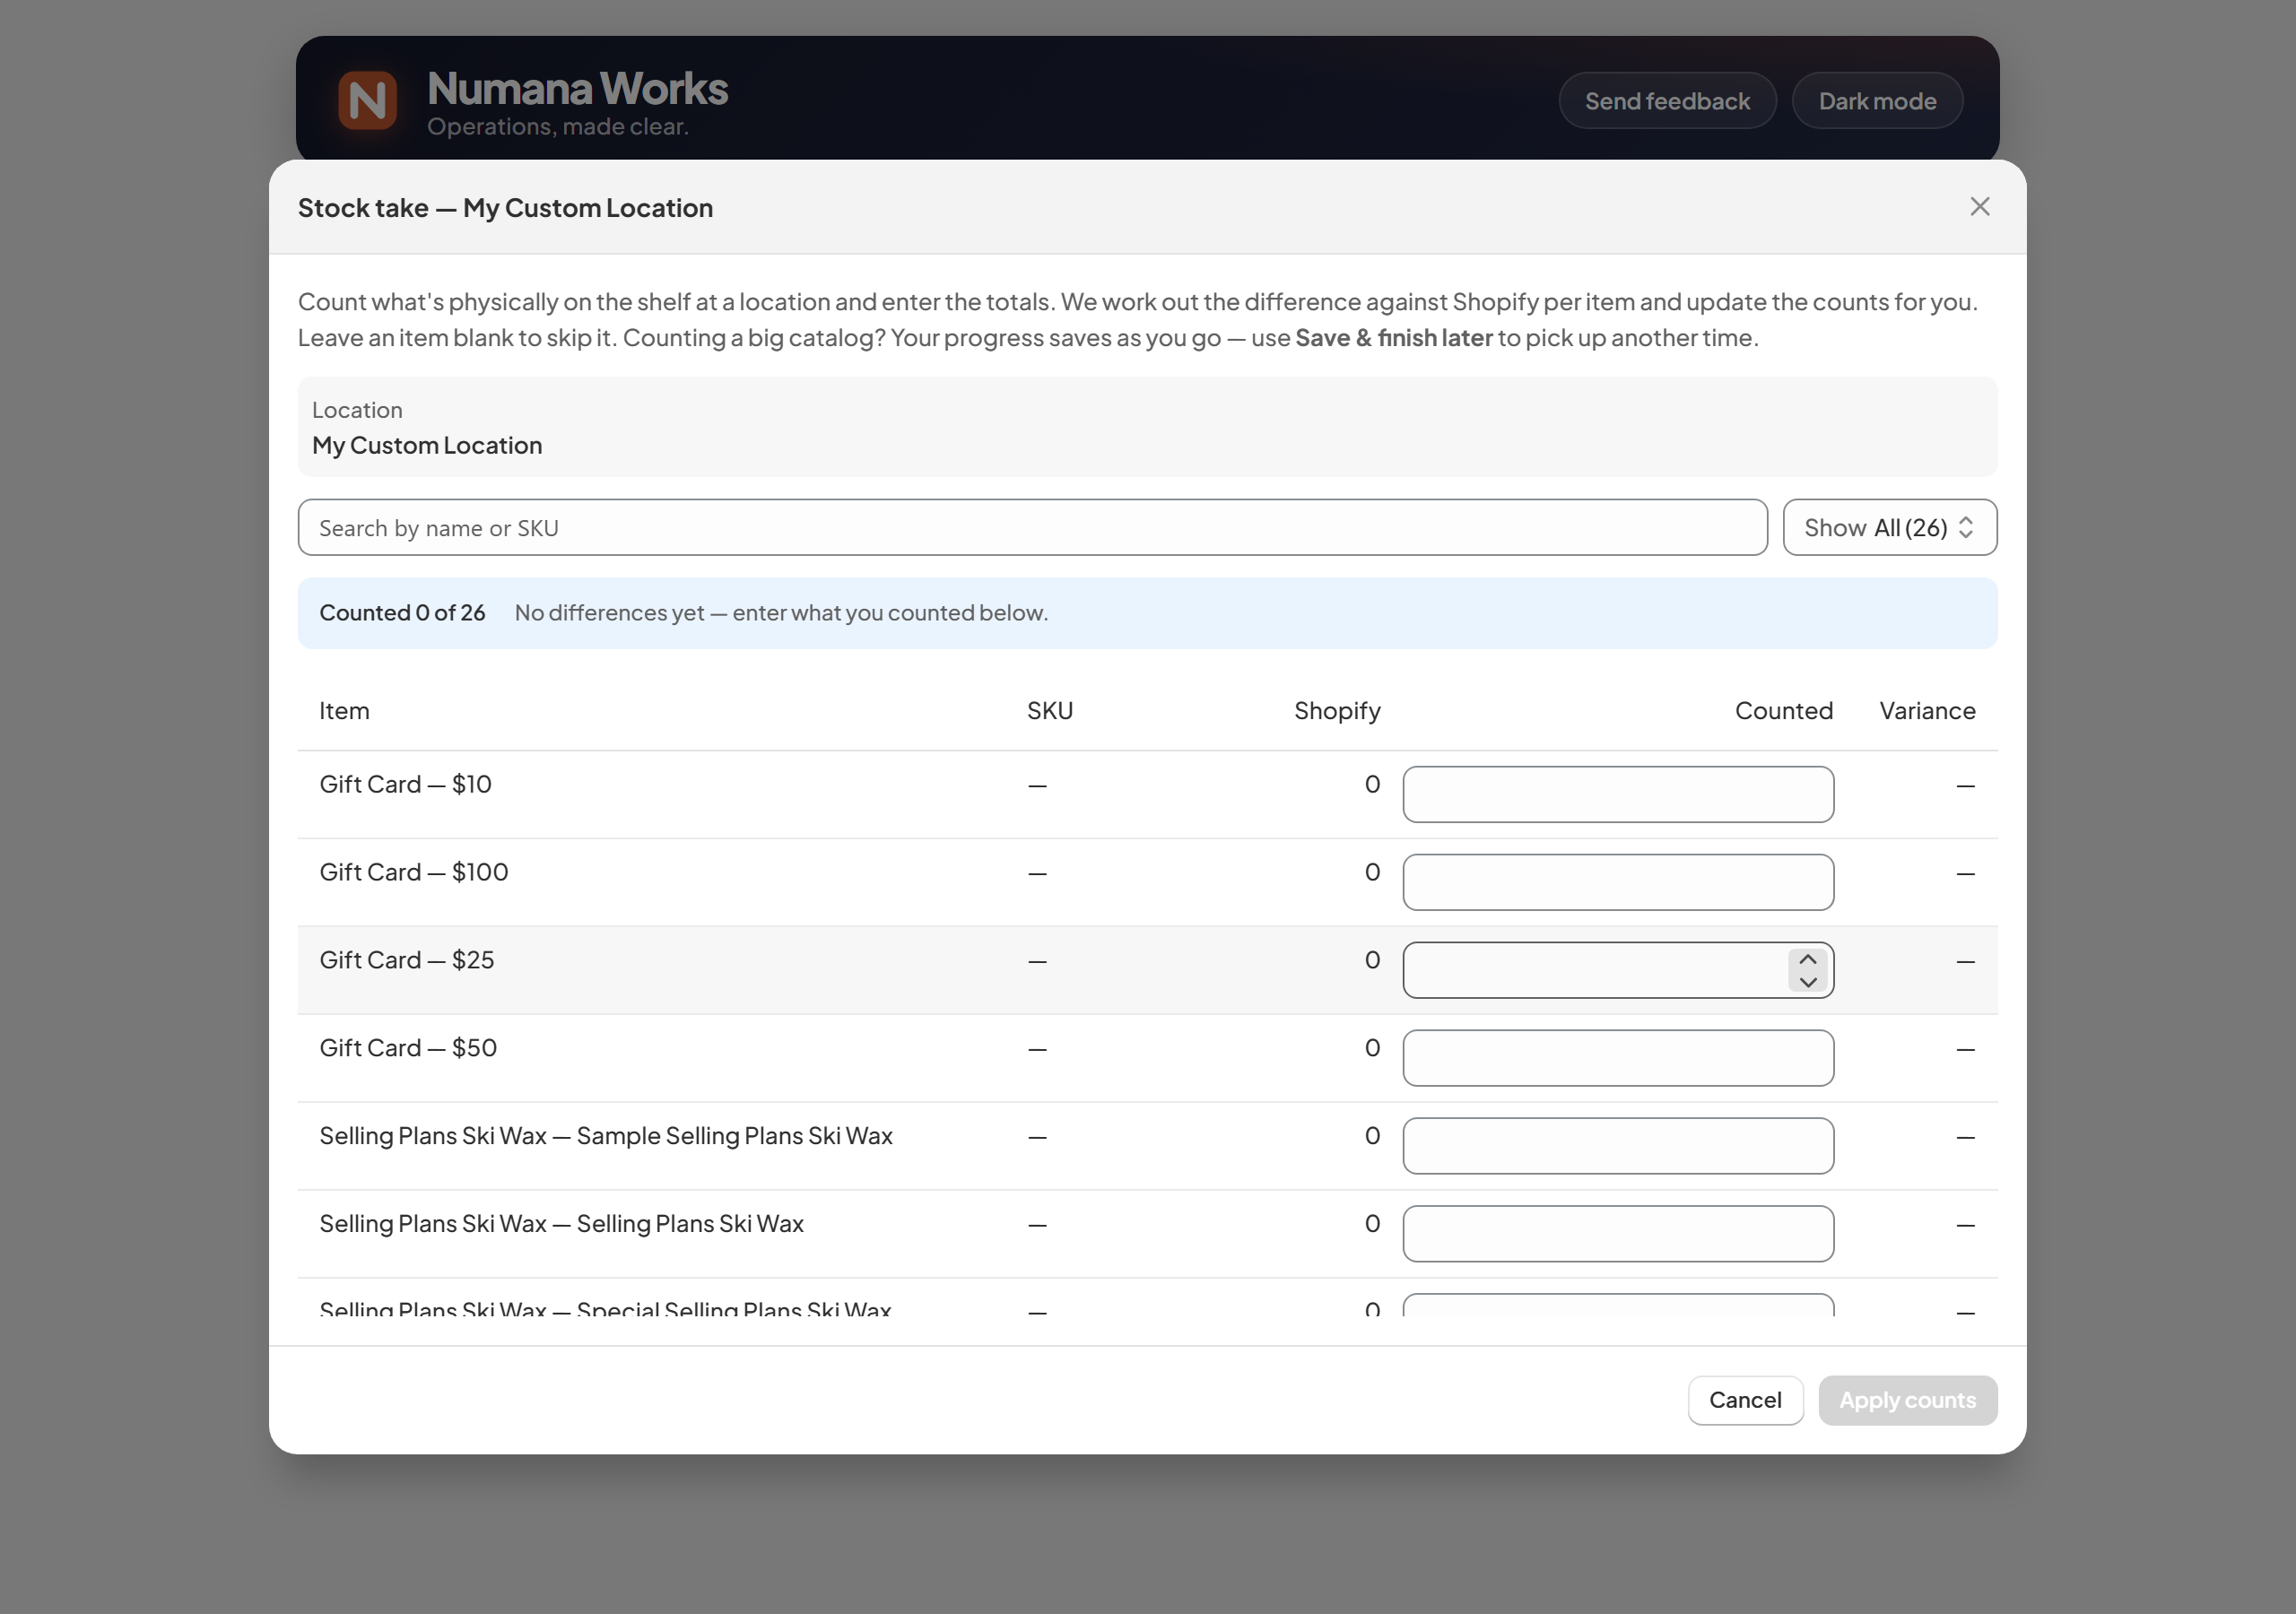
Step 2 — enter your counts; the variance is worked out for you.
For every item where your count differs, we set Shopify's on-hand at that location to the number you counted. Items left blank are untouched. Your inventory value moves with the new quantities — unit costs don't change.
Adjust stock — a quick ±N correction
For fixing one item by a known amount — breakage, loss, or stock you found. (Counting a whole location? Use Stock take.)
- Click Adjust stock, choose the item and location.
- Pick what happened — you have fewer than Shopify shows (remove) or more (add) — and enter how many units.
- Choose a reason (breakage, loss, found, count correction…) and click Apply adjustment.
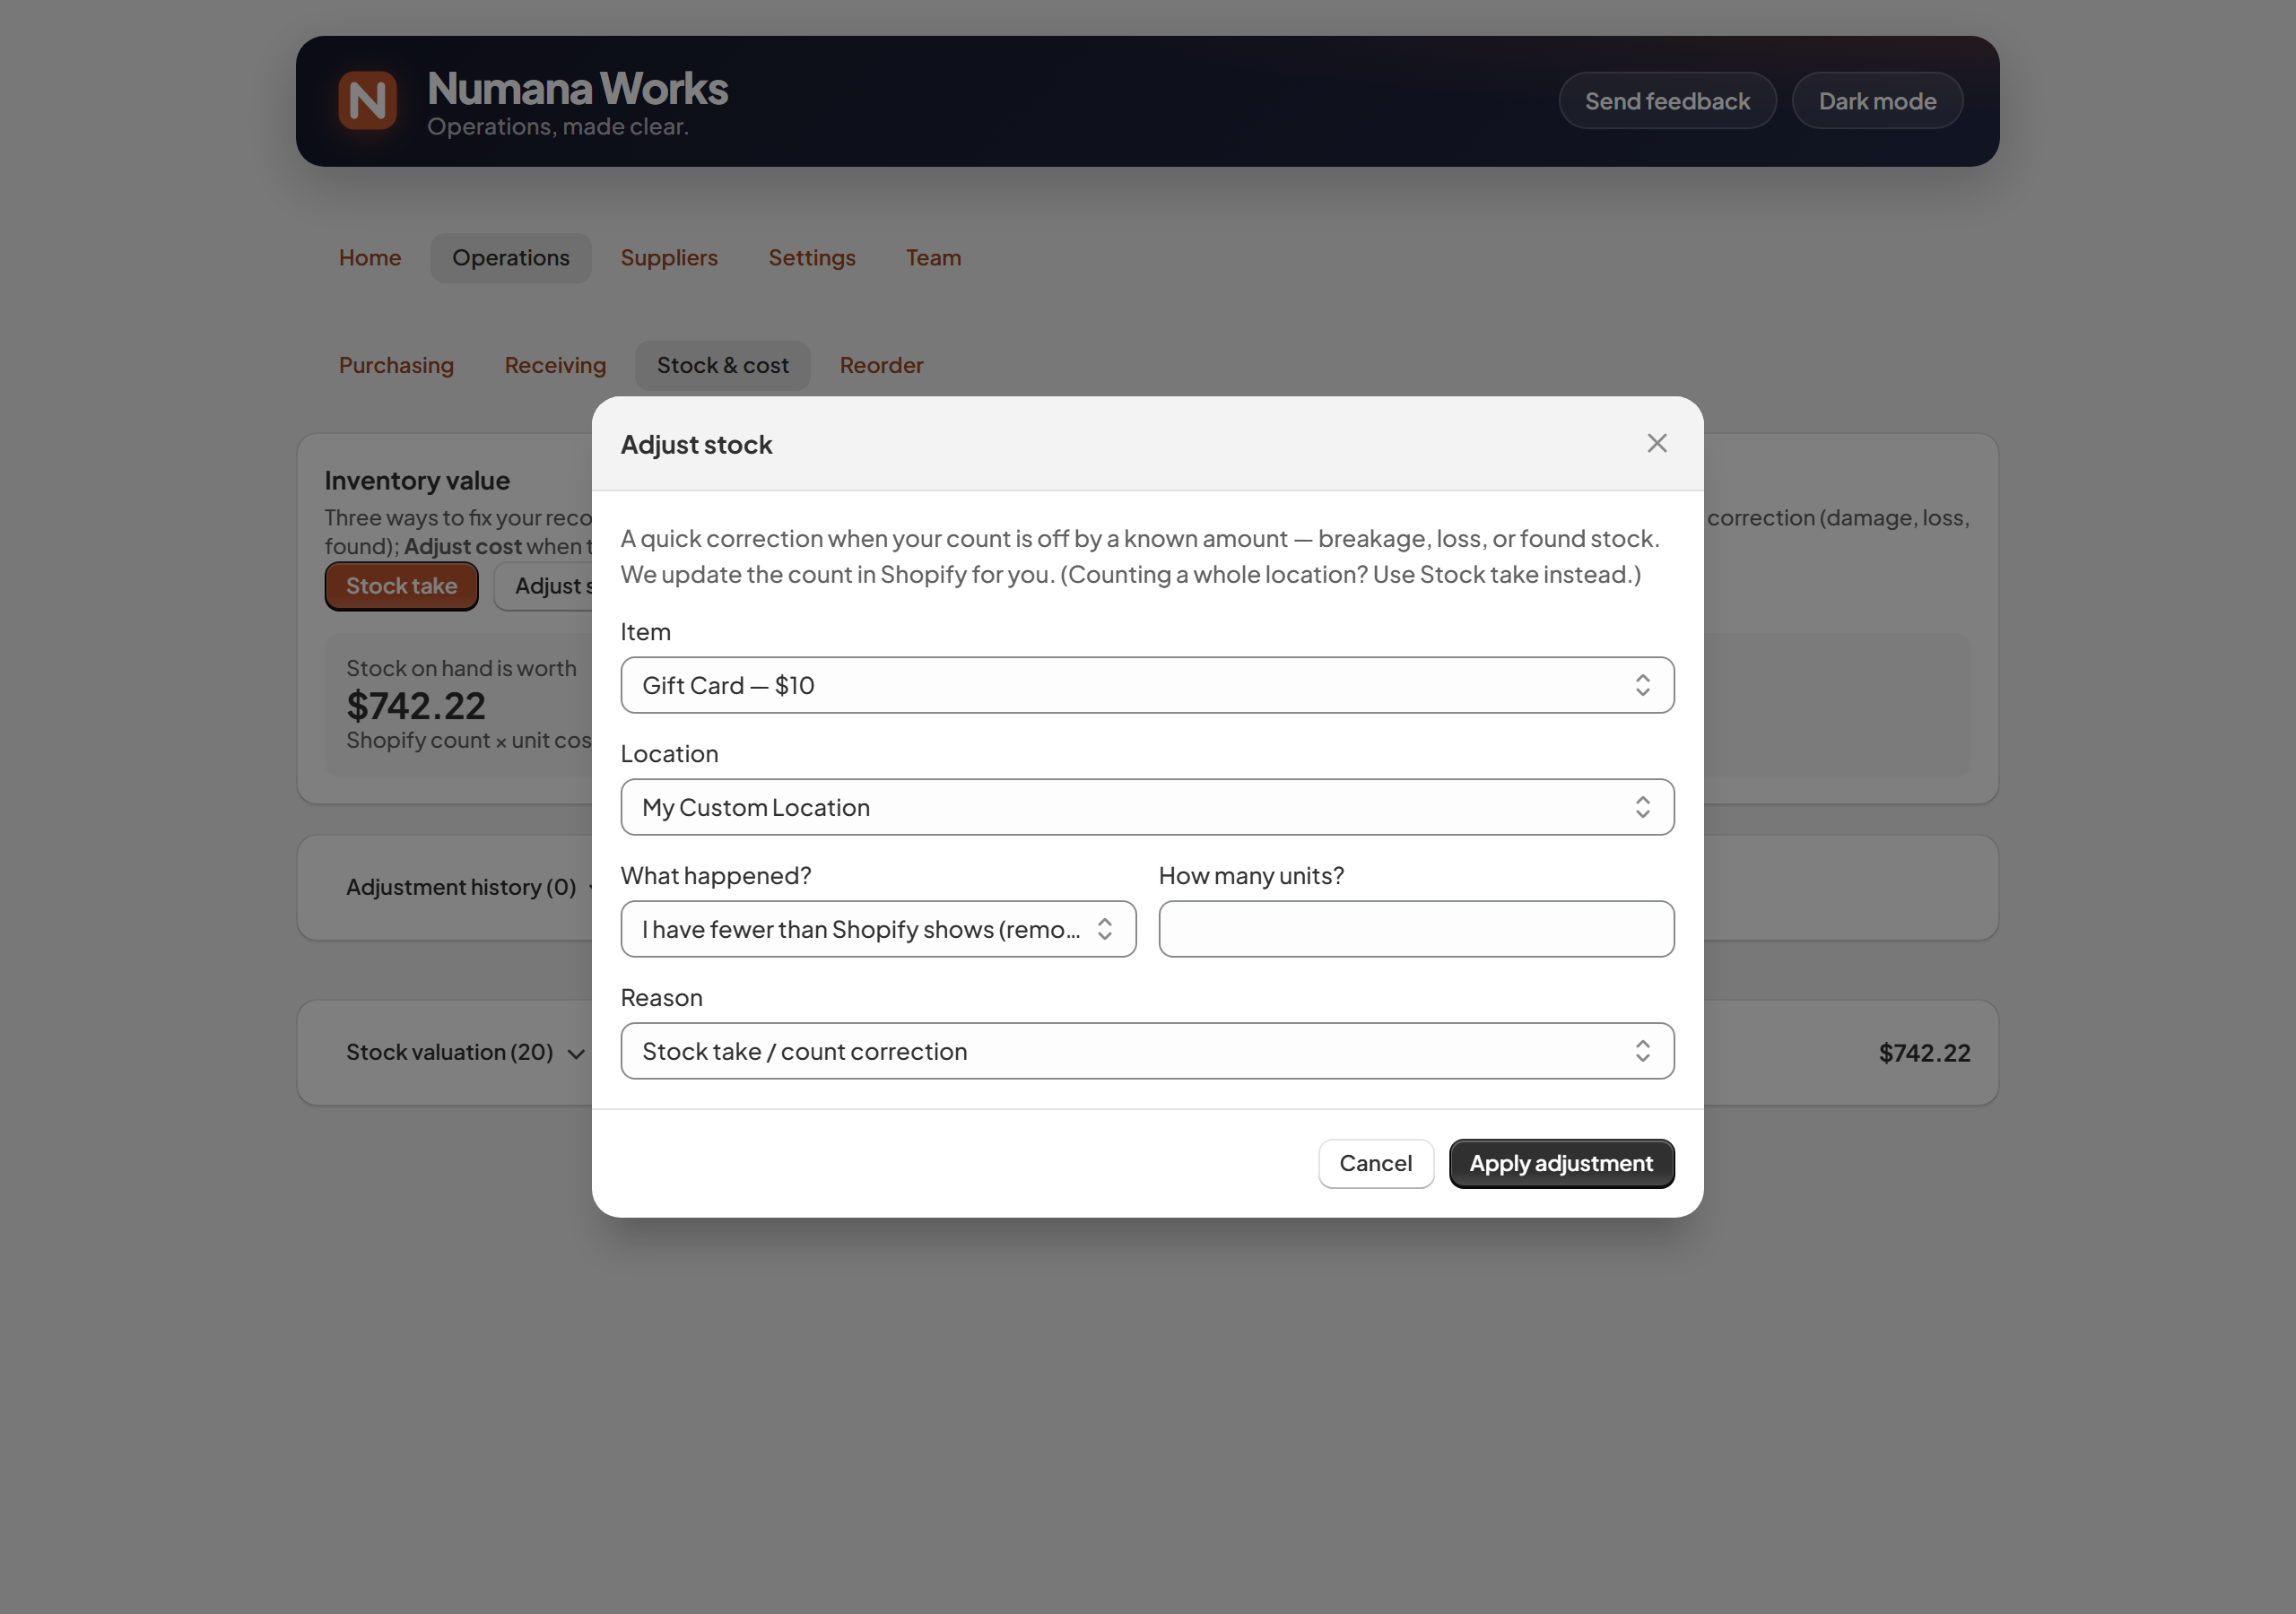
A one-line, reasoned correction.
We move Shopify's on-hand at that location up or down by the amount you entered. Nothing else changes — same unit cost, same other locations. The reason is kept in your history for the audit trail.
Adjust cost — set or correct a unit cost
Shopify stores one cost per item. This is how you change it outside of receiving — to fix a wrong cost or set a new one.
- Click Adjust cost and choose the variant.
- Enter the new cost.
- Choose how it should be recorded — the Treatment (below) — then Preview and Apply.
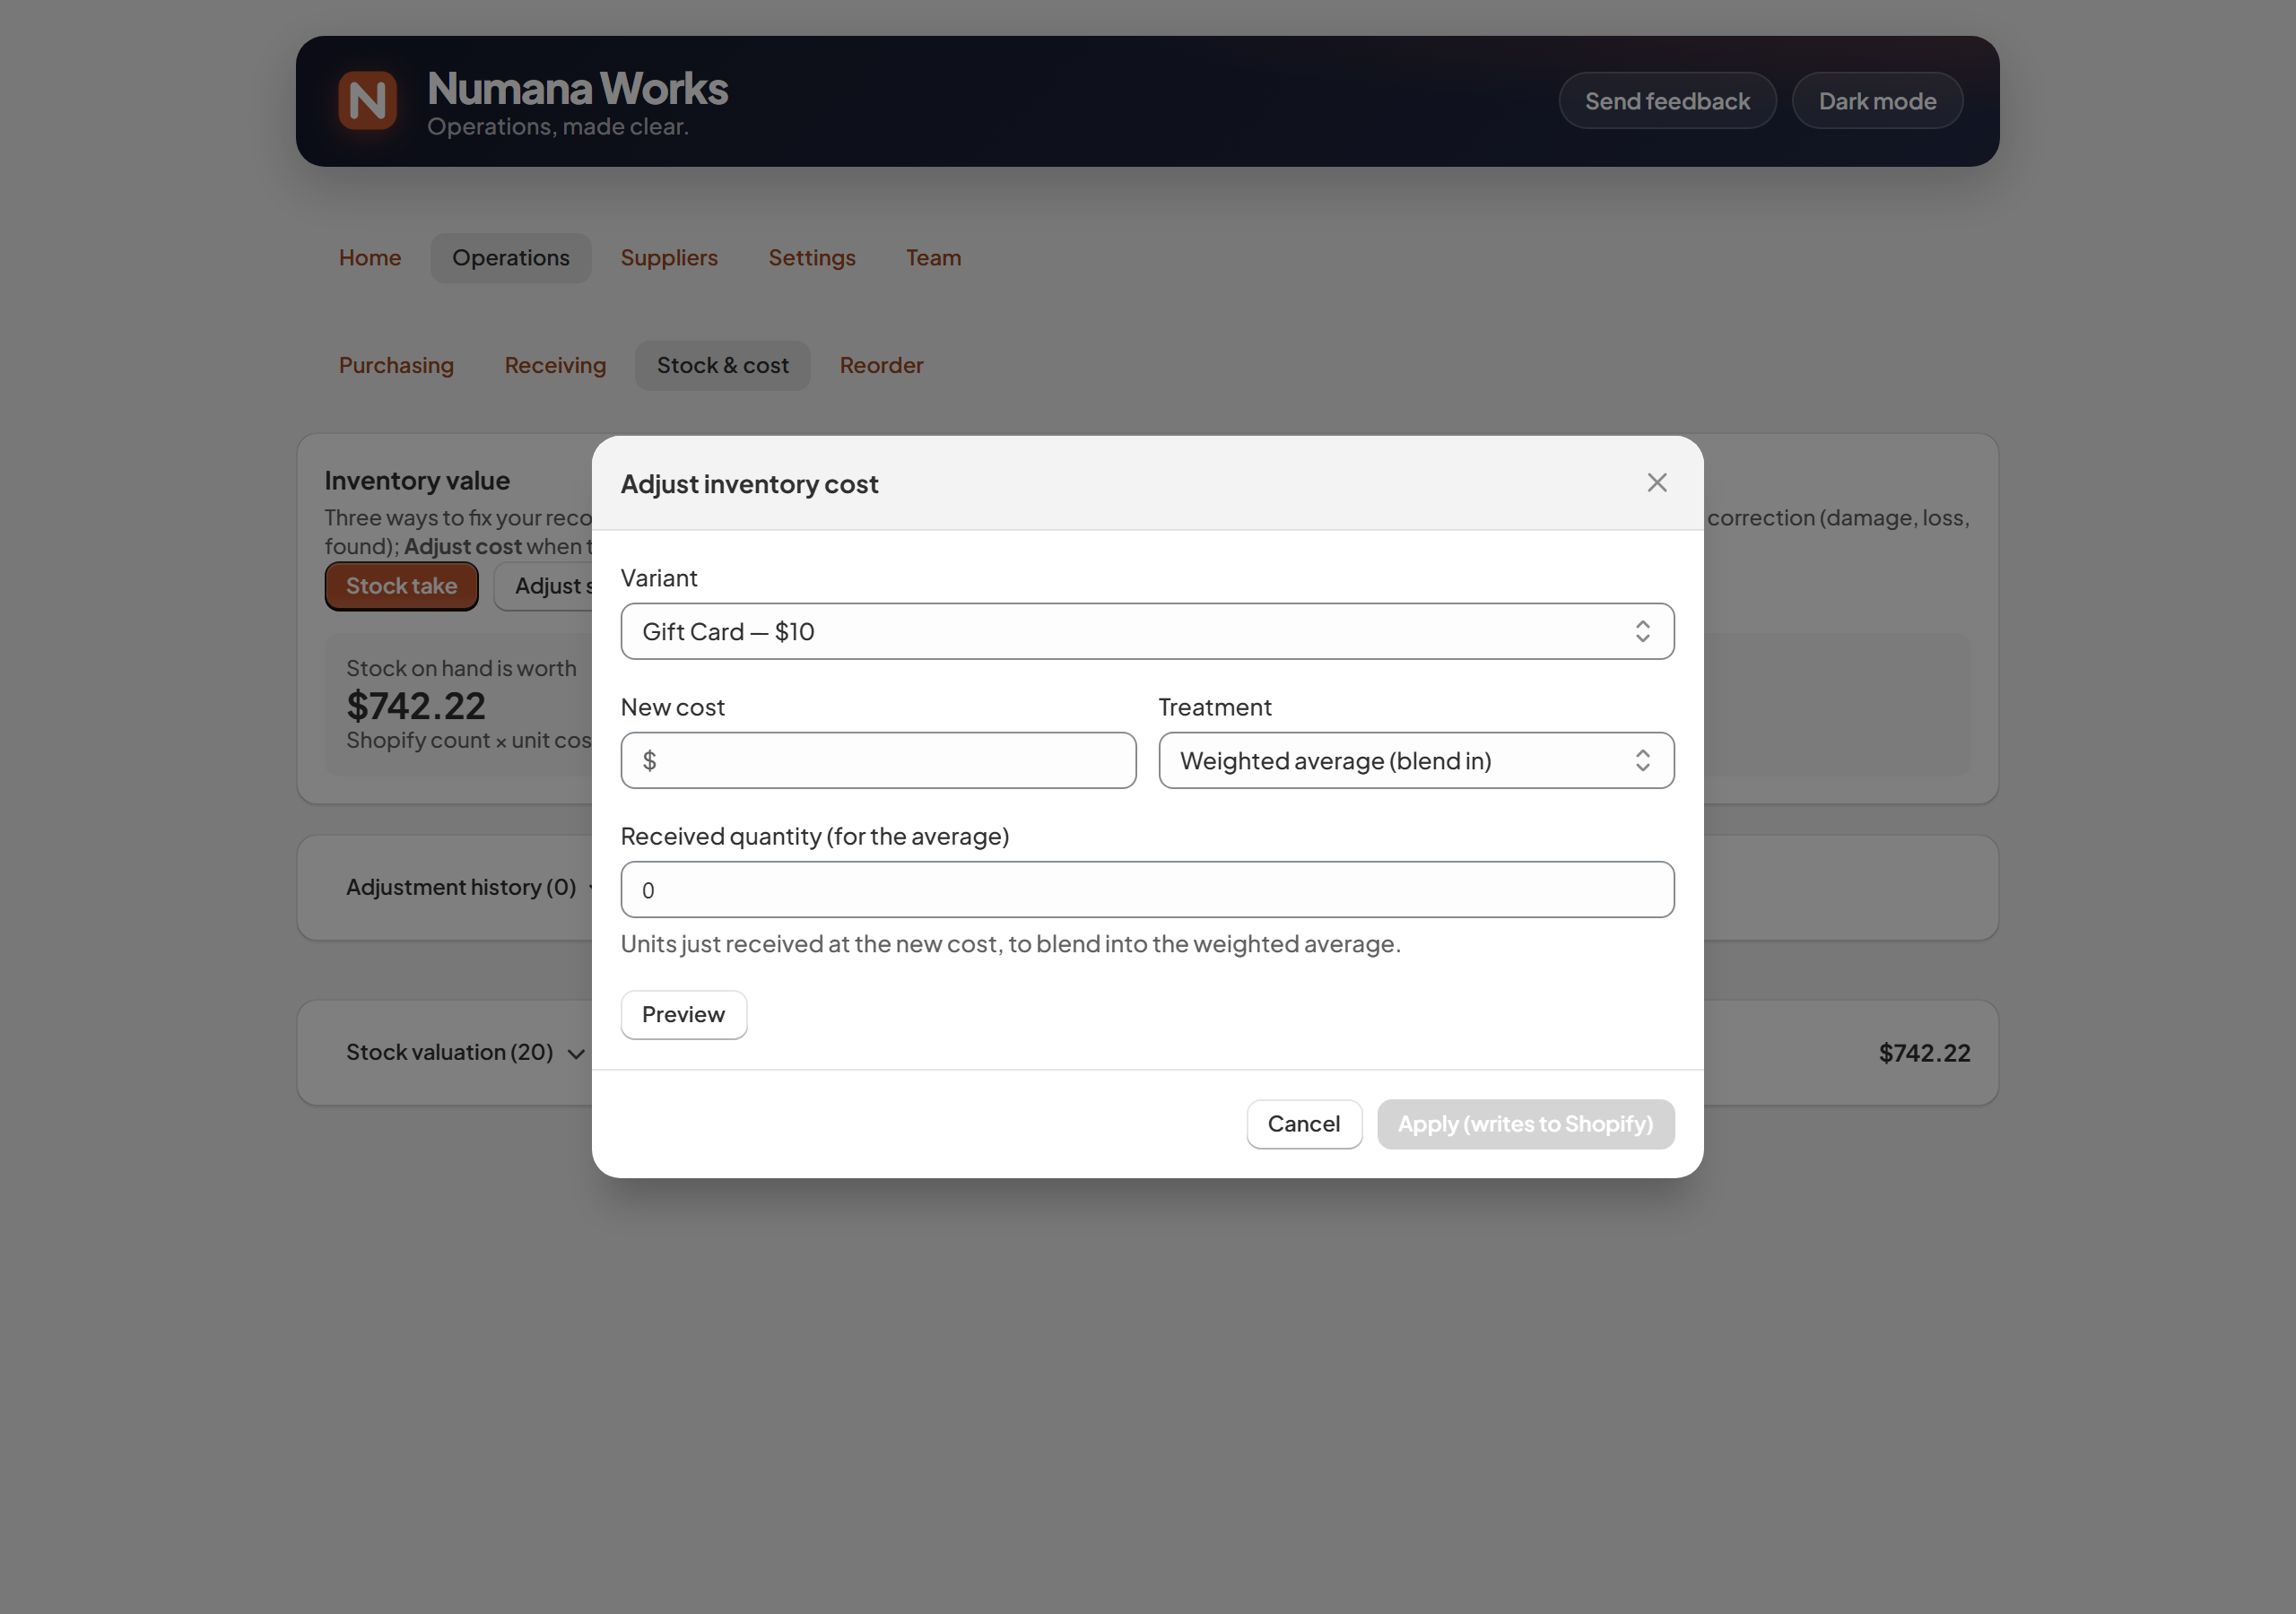
A cost change, with a choice of how it lands.
Weighted average (blend in)
Averages the new cost in with your existing on-hand. Enter the quantity received at the new cost and it blends proportionally — stock already on hand keeps its current value.
Use when topping up an item you keep buying.Revalue (set exact cost)
Replaces Shopify's cost with the new figure and revalues everything on hand to it.
Use to correct a wrong cost, or set a new standard cost.We write the new cost to Shopify's single InventoryItem cost. Weighted average blends it in — no value change to stock already on hand. Revalue replaces the cost and re-prices your on-hand, so your inventory value moves by the difference.
Transfer stock — move units between locations
Shift stock from one location to another. It's a move, not a gain or loss.
- Click Transfer stock and pick the From and To locations.
- Add each item and the quantity to move (the amount available at the source is shown). Use Add item for more.
- Click Transfer.
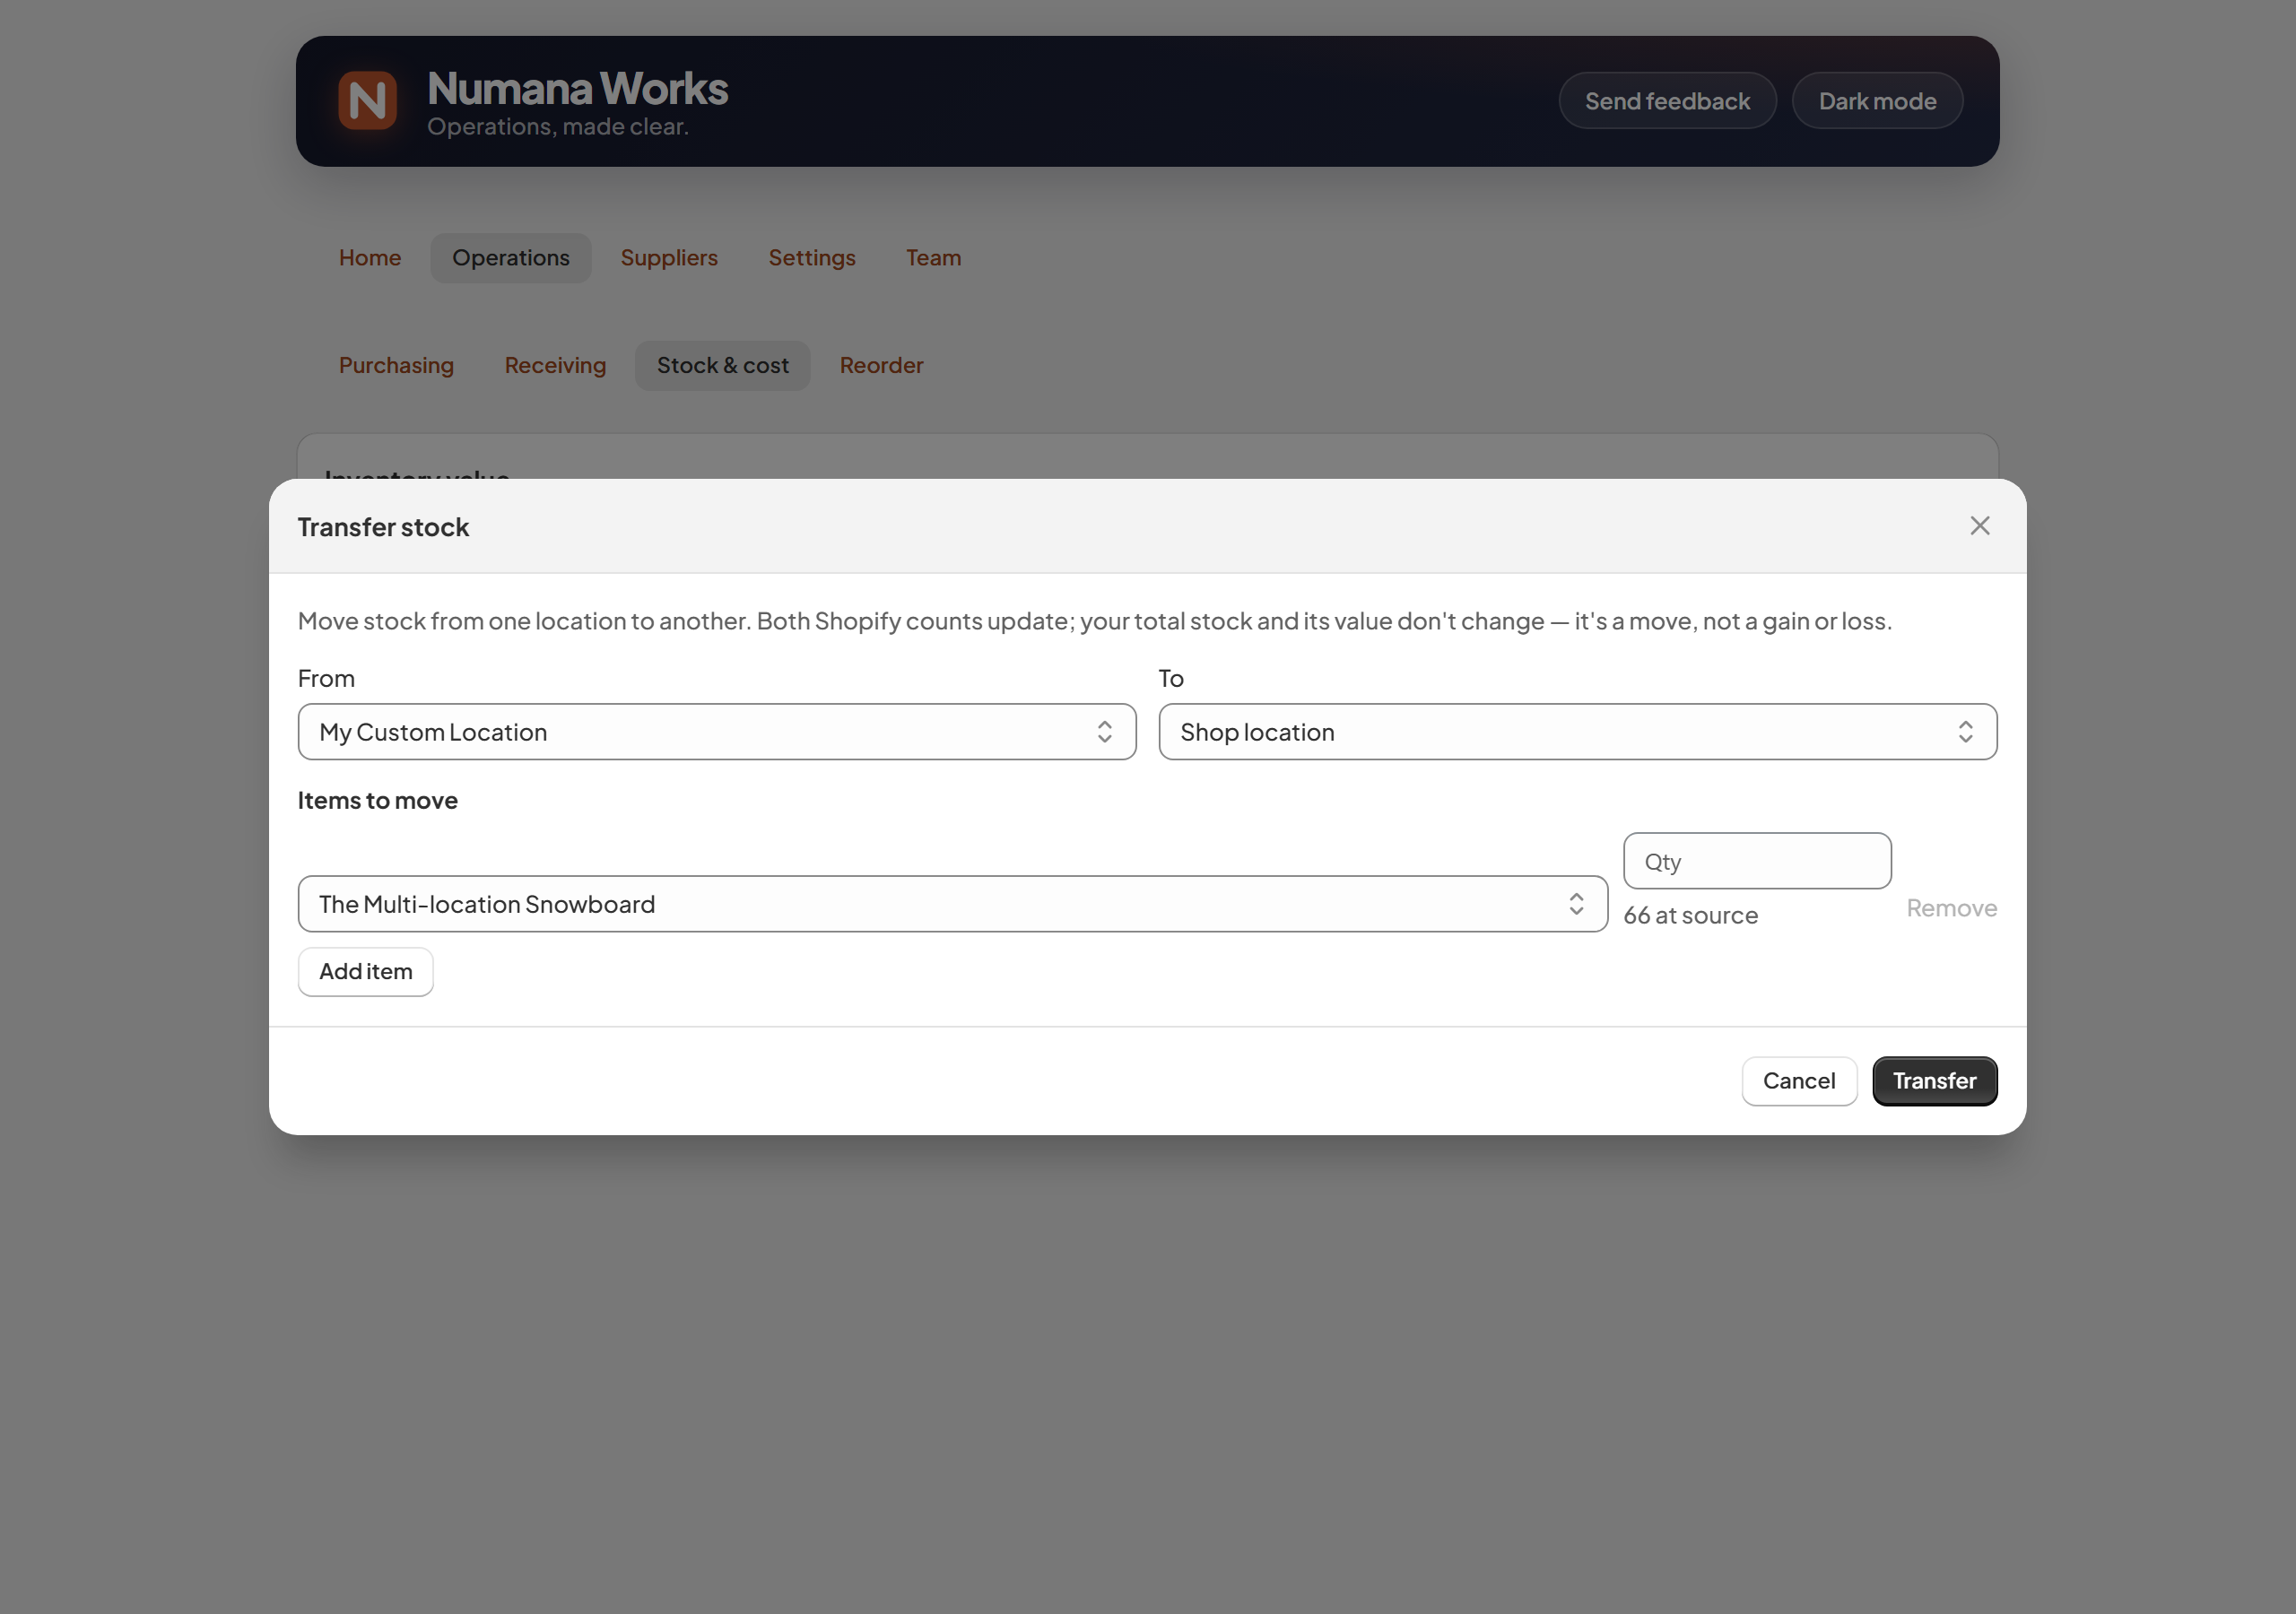
Move one or many items between two locations.
Both Shopify counts update — the source location goes down and the destination goes up by the same amount. Your total stock and its value don't change, and unit costs are untouched.
- Every action above is saved in the unified Stock & cost history — stock takes (ST), stock adjustments (SA), cost adjustments (CA) and transfers (TR) — filterable, each with a permanent ID.
- Items that still need a unit cost are flagged with a Set a cost prompt, so nothing is left unvalued.
Reorder
See what to reorder, based on your own sales — not a generic rule. Numana Works forecasts demand from your last 60 days of sales and flags what will run out before a new order can arrive.
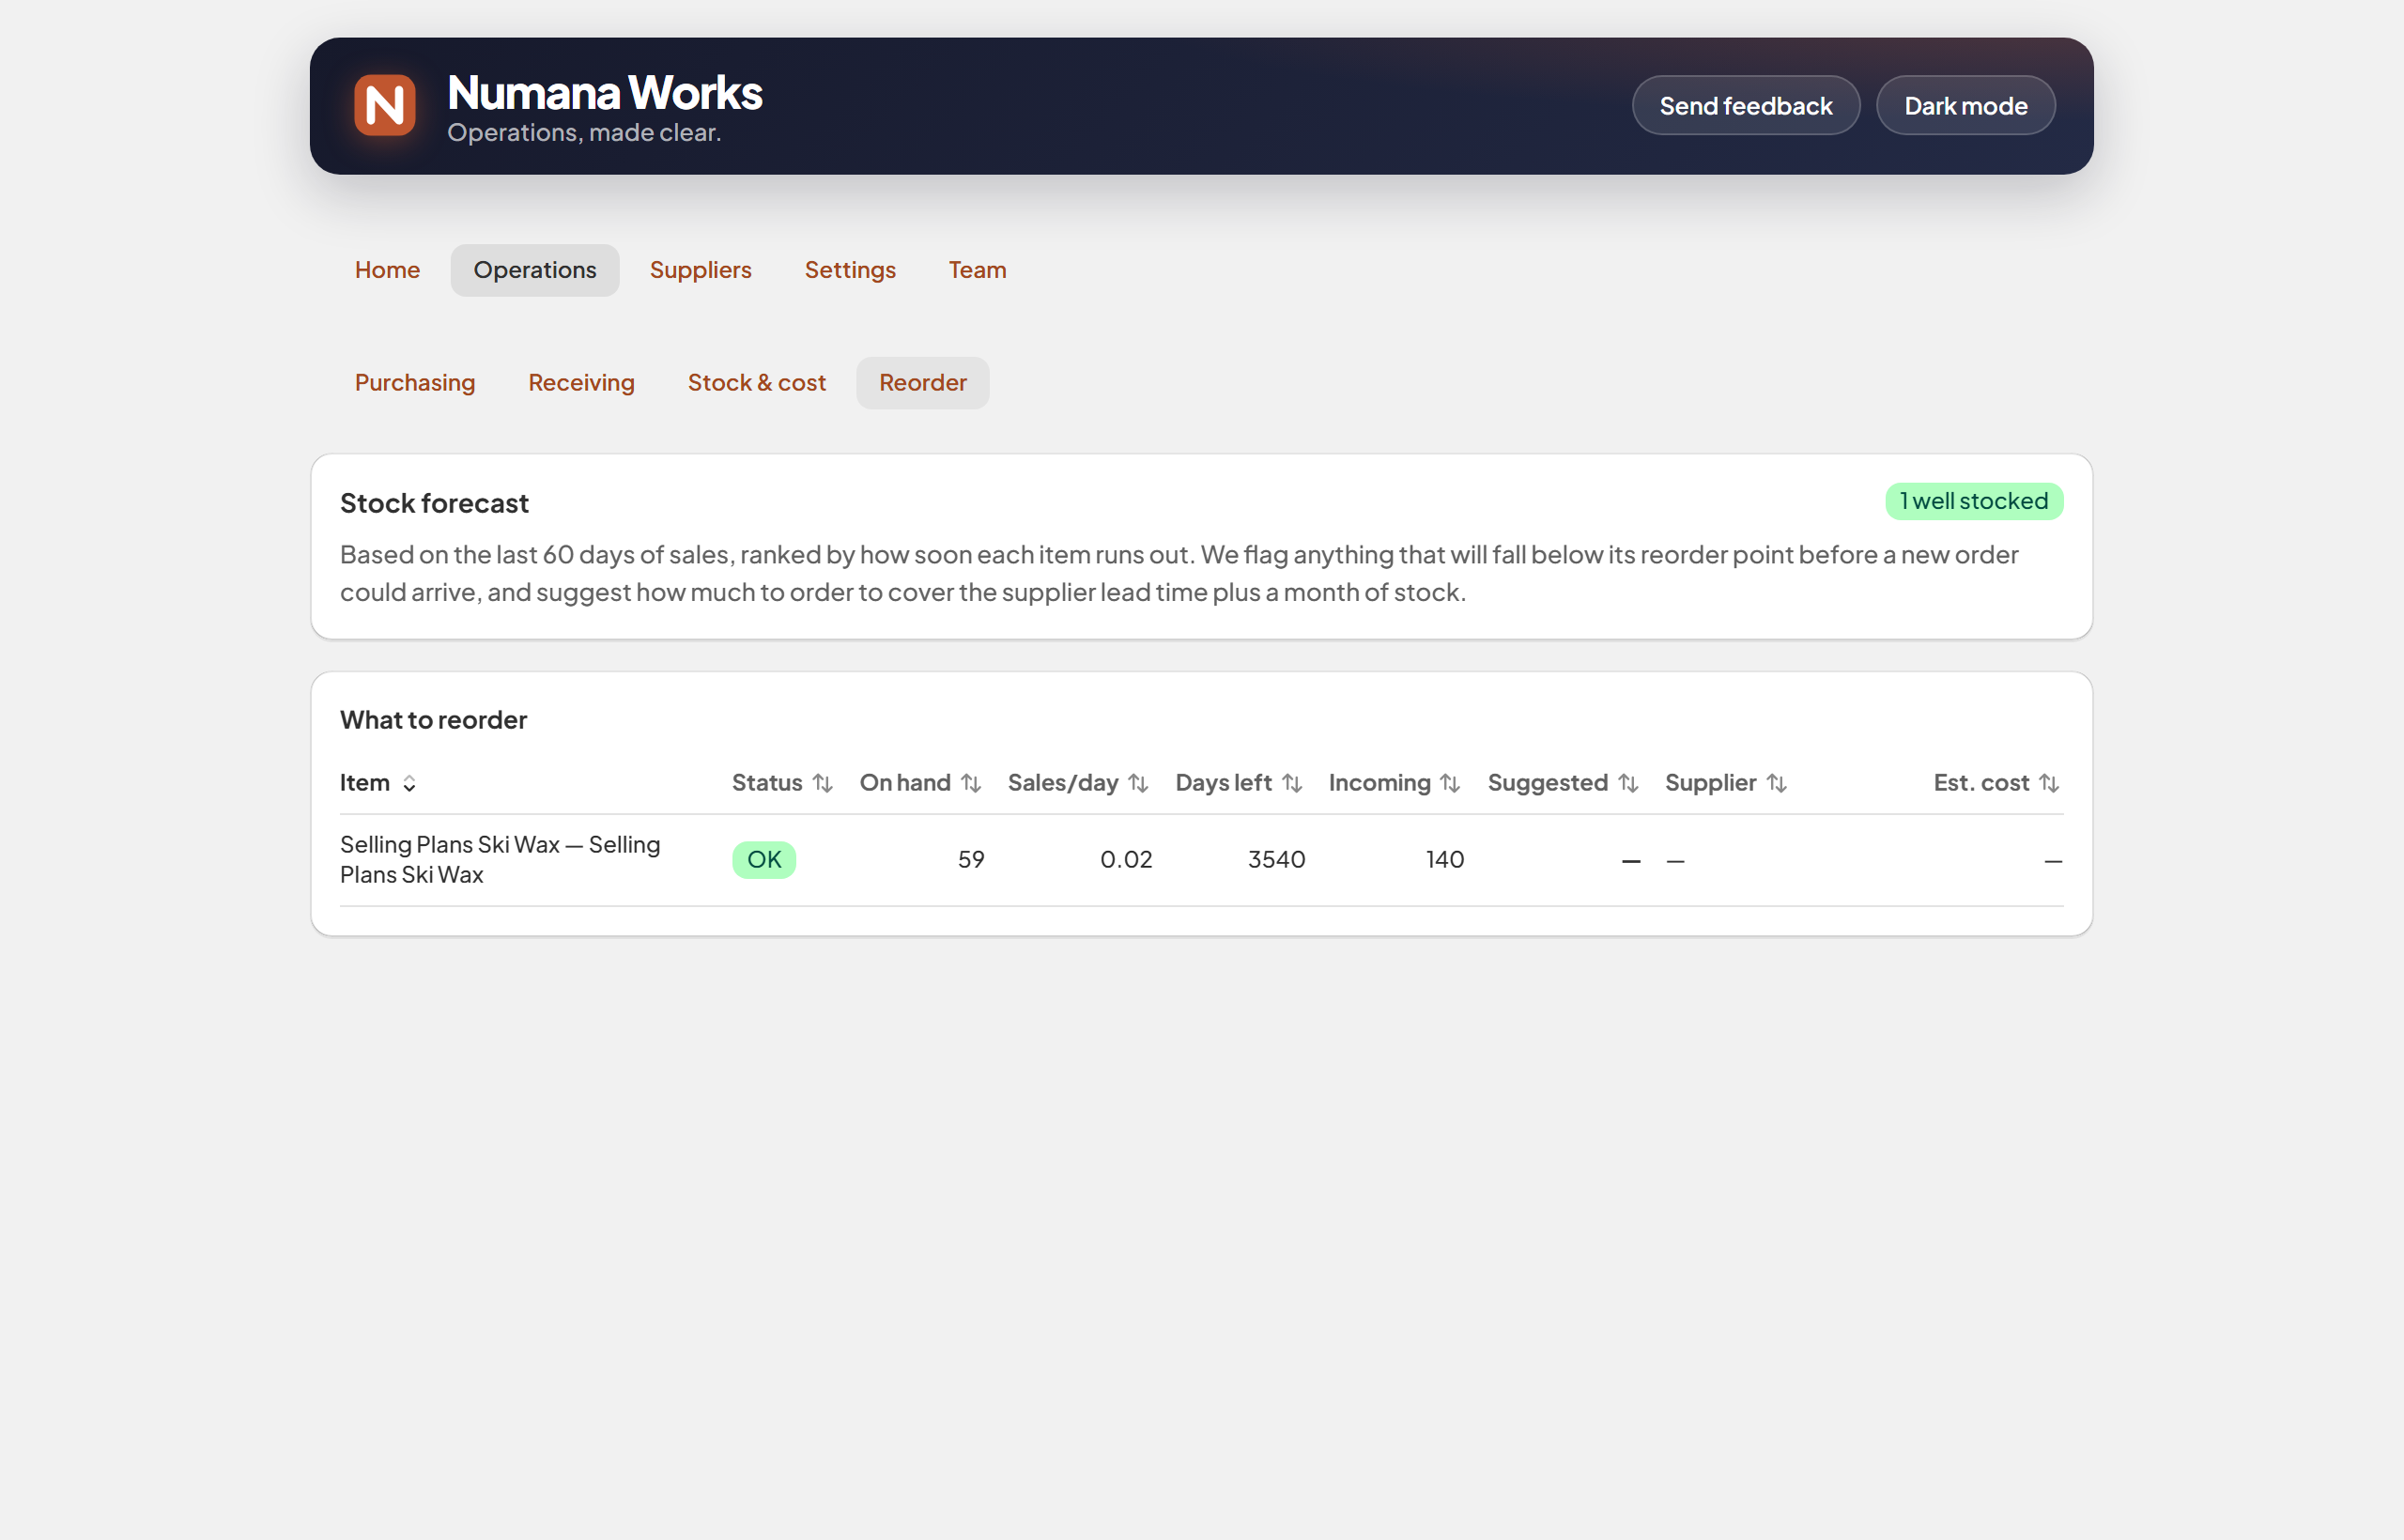
A forecast ranked by how soon each item runs out — with suggested order quantities.
- Open Operations → Reorder.
- Stock forecast ranks items by how soon they'll run out, given your sales rate and lead times.
- What to reorder shows each item's on hand, sales/day, days left, incoming, a suggested quantity, the supplier and an estimated cost.
- Start a purchase order straight from a suggestion when something needs restocking.
An item selling 0.02/day with 59 on hand shows as well stocked. When something starts selling faster than it's replenished, it climbs the forecast and surfaces a suggested order quantity — enough to cover the supplier's lead time plus a month of stock — and the supplier to order it from.
- The forecast uses your real sales, so it adapts as your store's demand changes.
- Suggested quantities account for stock already incoming on open POs, so you don't double-order.
Suppliers
Keep your suppliers — contacts, currency, lead time and every order with them — in one place, so creating and tracking POs is fast.
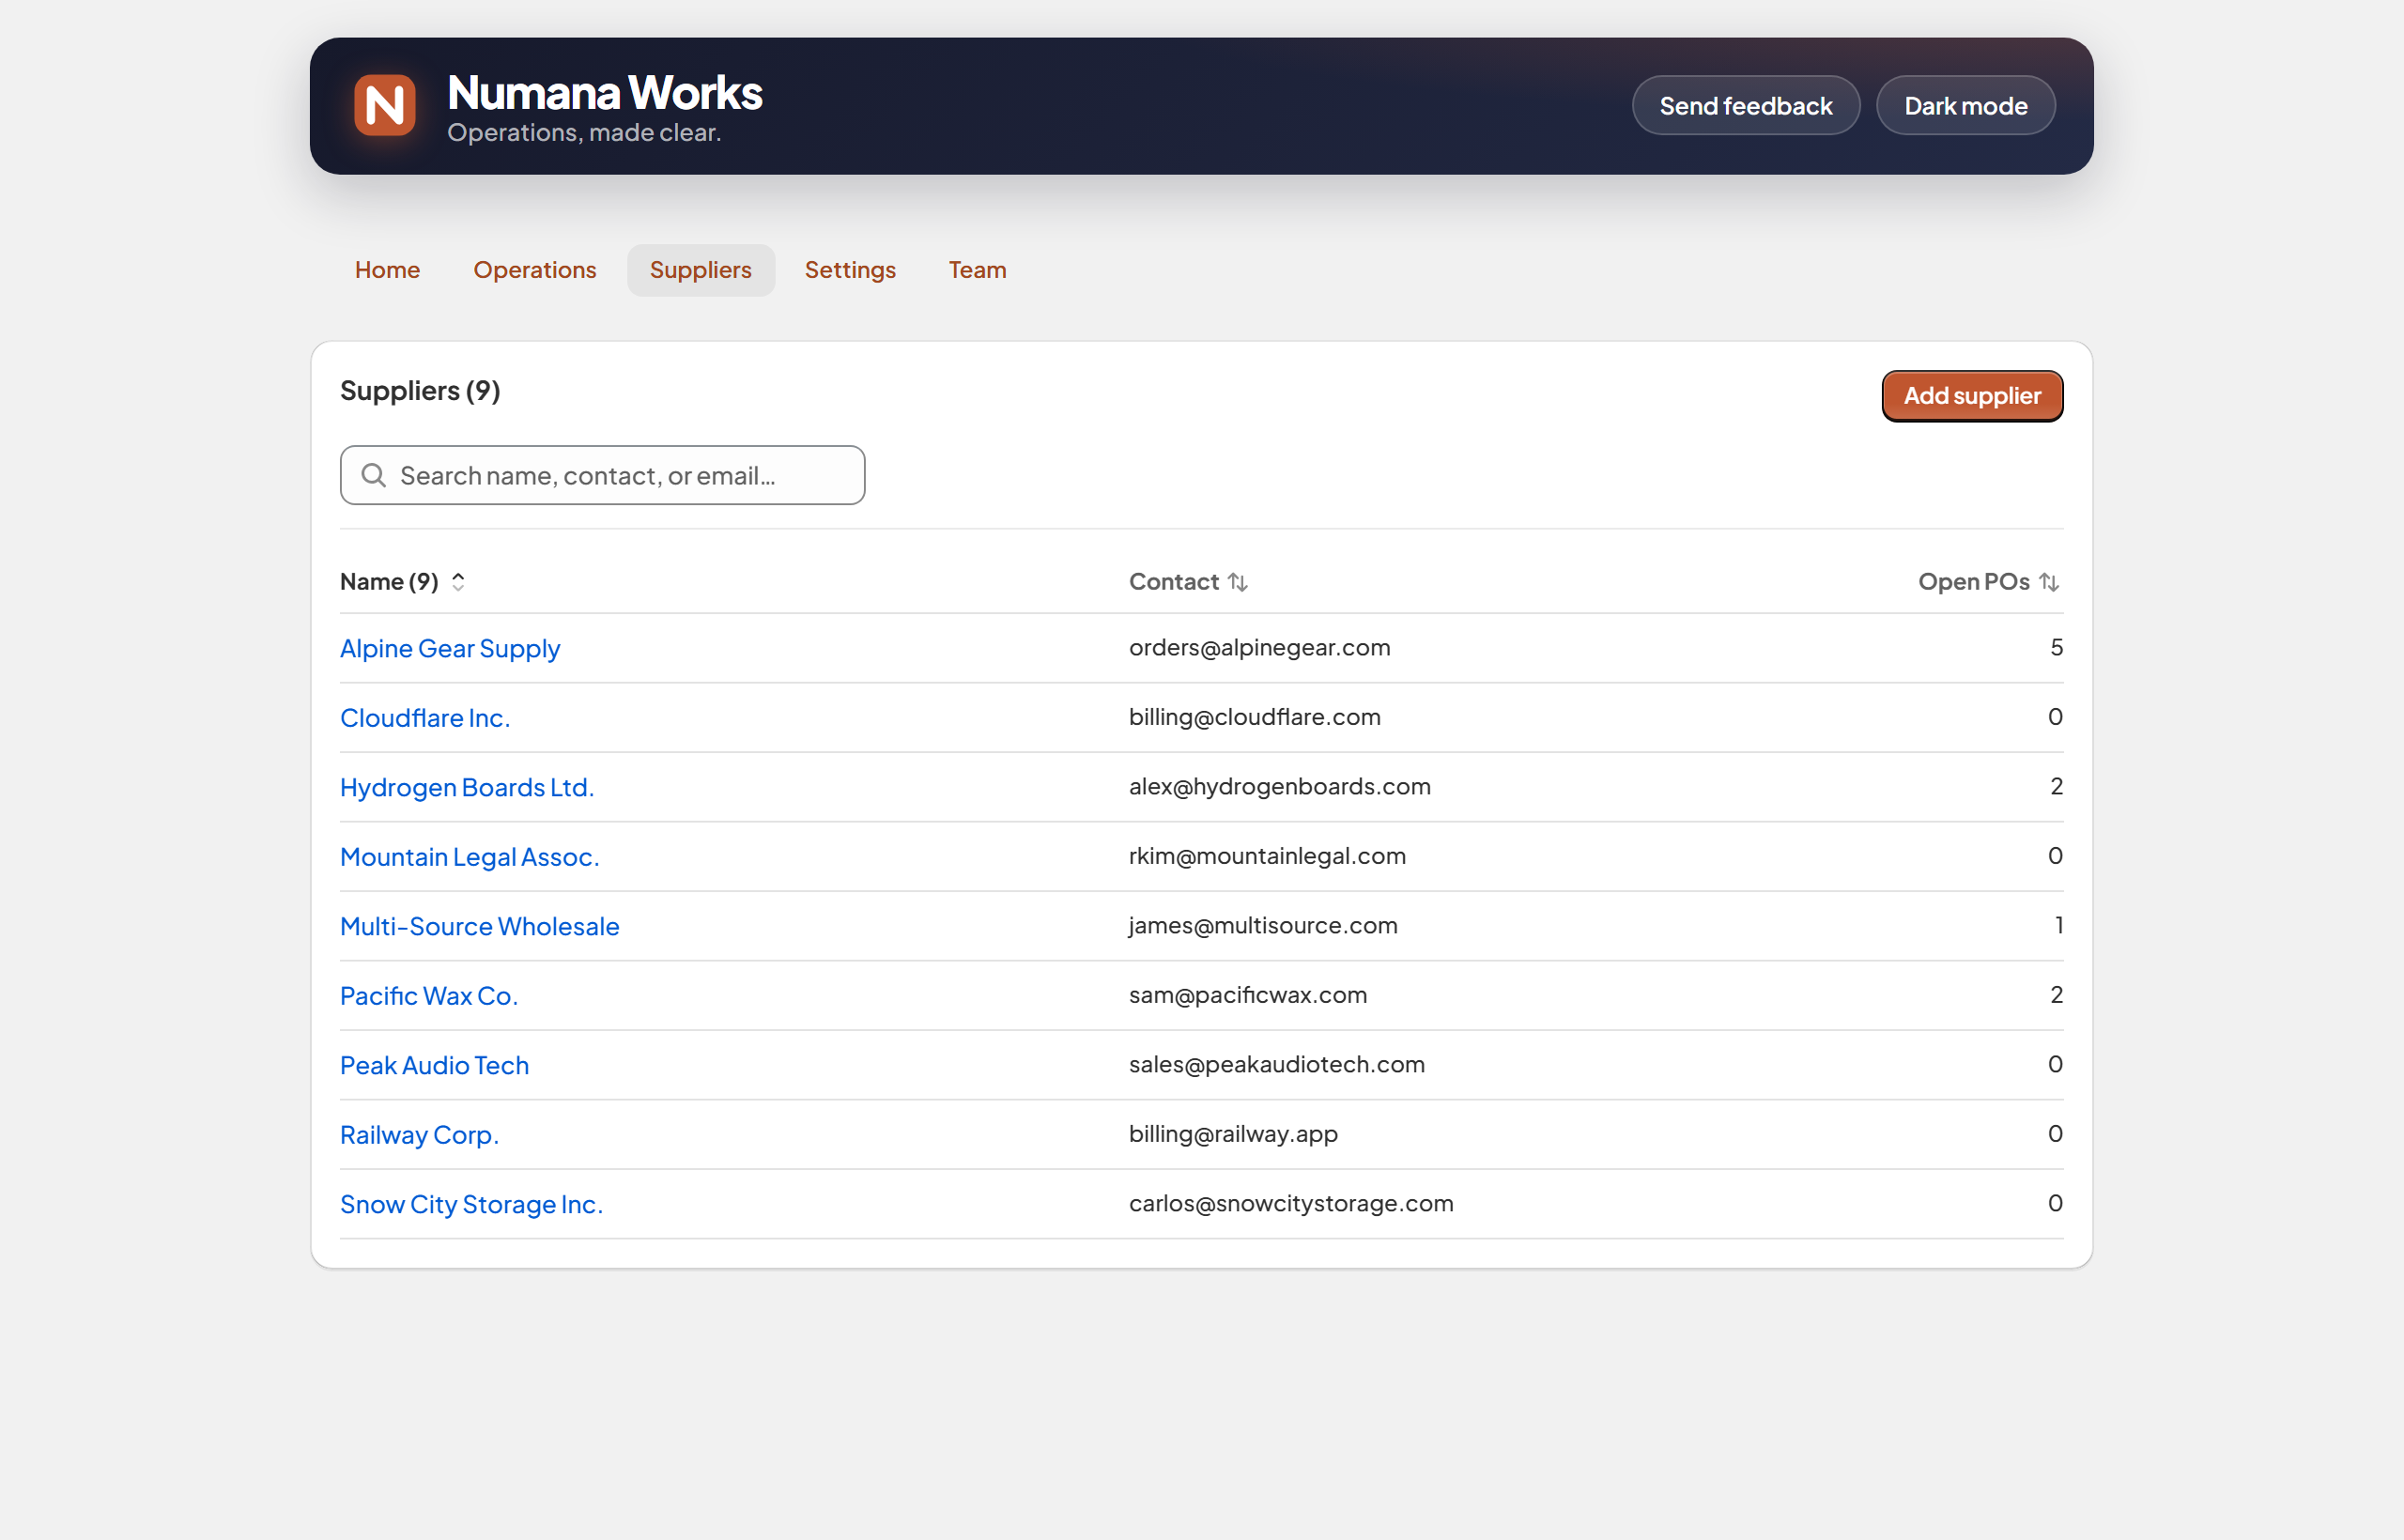
Your suppliers, searchable, with open-PO counts at a glance.
- Open the Suppliers tab. Click Add supplier to add one (name, contact, email, currency, lead time), or use the search to find an existing one.
- Click any supplier to open its detail — contacts, currency, lead time, and every purchase order with them and its status and value.
- Start a new PO for that supplier right from the detail view.
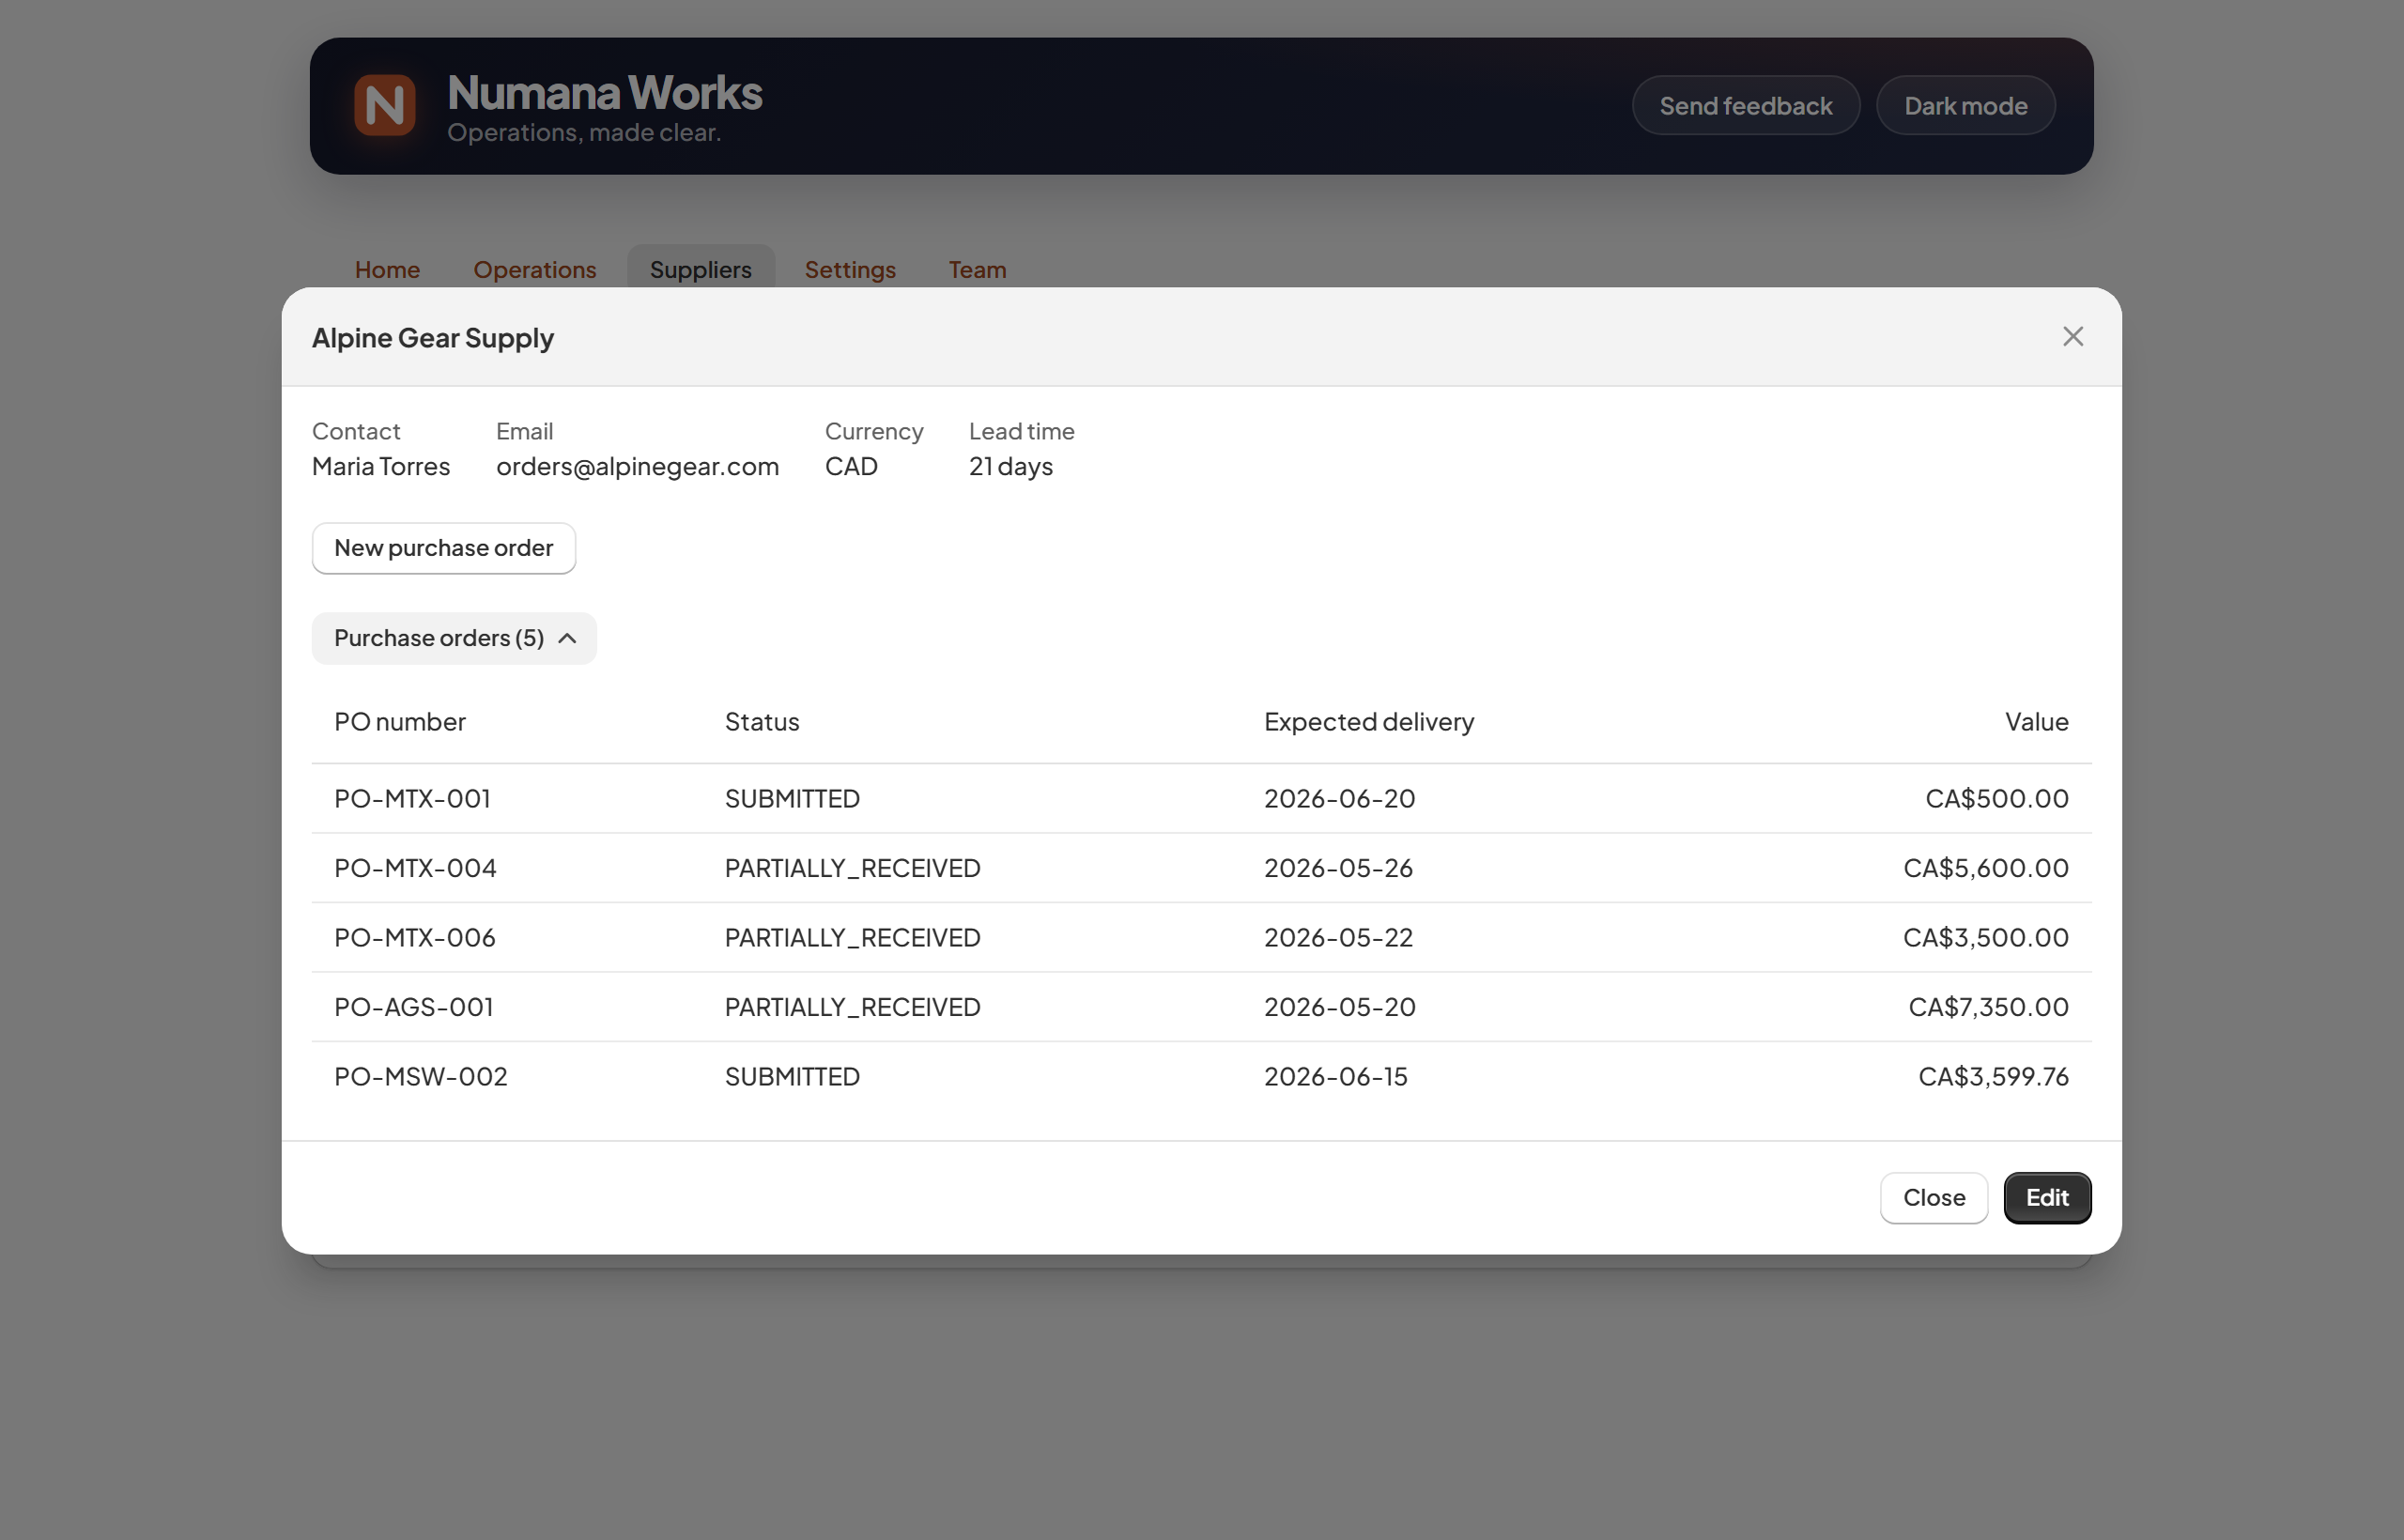
A supplier's detail — contacts, lead time, and all their POs.
Open Alpine Gear Supply to see Maria Torres / orders@alpinegear.com, currency CAD, a 21-day lead time, and all 5 purchase orders with them — each with its status and value — then start your next order without leaving the page.
- A supplier's lead time feeds the reorder forecast, so suggestions account for how long they take to ship.
Tips & settings
A few things that make Numana Works fit the way you already work.
- Multiple locations & currencies — Numana Works works across all of them in one place.
- Document branding — add your company name, address, logo, payment terms and footer so the POs you send suppliers look professional. Set it in Settings › Purchasing.
- Auto-numbering — POs are numbered for you; override any number to match your own scheme.
- Roles — invite your team as Owner, Operator or Viewer, so people see and do exactly what they should.
- No POS Pro required — works for any Shopify store, online-first or retail.
- Your data — Numana Works reads only order financial data (totals, tax, line items) to keep your inventory and costs accurate. It does not request or store customer names, emails, phone numbers or addresses. See the Privacy Policy.
- Your products, inventory, unit costs and locations are already synced from Shopify, so there's nothing to import there. You add suppliers in a quick form. (There's no Stocky API, so there's no automatic Stocky import.)
- Numana Works is focused on operations today. Full books & accounting — supplier bills, payments and financial statements — are a planned future upgrade; your operations data carries over.
Still stuck?
Email us — you'll hear from someone who understands operations and how a store actually runs.